1. 为什么需要AOP
关于消除重复代码,定义公共父类使用继承的方式实现是一种常见的思路。但是例如性能监控、事务管理,这类重复代码的特点是和业务代码紧密结合在一起,无法通过继承的方式解决。
比如在程序运行中,想计算每个方法的行时间, 就没有办法通过继承的方式去消除这类重复代码
1
2
3
4
5
6
7
8
9
10
11
12
13
14
15
16
17
18
19
20
21
22
| public class UserService {
public void createUser(String username) {
long startTime = System.currentTimeMillis();
System.out.println("Creating user: " + username);
long endTime = System.currentTimeMillis();
System.out.println("createUser方法执行时间: " + (endTime - startTime) + "ms");
}
public void deleteUser(String username) {
long startTime = System.currentTimeMillis();
System.out.println("Deleting user: " + username);
long endTime = System.currentTimeMillis();
System.out.println("deleteUser方法执行时间: " + (endTime - startTime) + "ms");
}
}
|
AOP 就是解决这类重复的方式。
AOP是Aspect Oriented Programing的简称, 面向切面编程。
在AOP中,将重复性代码抽取出来是很容易的,但如何将这些独立的逻辑融合到业务逻辑中完成和原来一样的业务操作,这才是事情的关键,也正是AOP要解决的主要问题。
本文将先介绍Spring 中各种使用AOP的方法,作为后面介绍原理的前置知识。
具体实现原理可以阅读以下文章:
Spring AOP XML配置方式原理详解
Spring AOP 注解方式原理详解
2. 手动配置代理 - ProxyFactoryBean
1
2
3
4
5
6
7
8
9
10
11
12
13
14
15
16
17
18
19
20
21
22
23
24
25
26
27
28
29
30
31
32
33
34
35
36
37
38
39
40
41
42
43
44
45
46
47
48
49
50
51
52
| public class UserService {
public void createUser(String username) {
System.out.println("Creating user: " + username);
}
public void deleteUser(String username) {
System.out.println("Deleting user: " + username);
}
}
public class LoggingBeforeAdvice implements MethodBeforeAdvice {
@Override
public void before(Method method, Object[] args, Object target) throws Throwable {
System.out.println("Before method: " + method.getName());
}
}
public class LoggingAfterAdvice implements AfterReturningAdvice {
@Override
public void afterReturning(Object returnValue, Method method, Object[] args, Object target) throws Throwable {
System.out.println("After method: " + method.getName());
}
}
public class LoggingMethodInterceptor implements MethodInterceptor {
@Override
public Object invoke(MethodInvocation invocation) throws Throwable {
long startTime = System.currentTimeMillis();
System.out.println(invocation.getMethod().getName()+ " 方法开始执行");
Object result = invocation.proceed();
long endTime = System.currentTimeMillis();
System.out.println(invocation.getMethod().getName()+ "方法执行时间: " + (endTime - startTime) + "ms");
return result;
}
}
|
applicationContext.xml 配置如下
1
2
3
4
5
6
7
8
9
10
11
12
13
14
15
16
17
18
19
20
21
22
23
24
25
26
27
28
29
30
31
32
33
34
35
36
37
38
| <?xml version="1.0" encoding="UTF-8"?>
<beans xmlns="http://www.springframework.org/schema/beans"
xmlns:xsi="http://www.w3.org/2001/XMLSchema-instance"
xmlns:aop="http://www.springframework.org/schema/aop"
xsi:schemaLocation="http://www.springframework.org/schema/beans
http://www.springframework.org/schema/beans/spring-beans.xsd
http://www.springframework.org/schema/aop
http://www.springframework.org/schema/aop/spring-aop.xsd">
<bean id="userService" class="com.example.codingInAction.service.UserService"/>
<bean id="loggingBeforeAdvice" class="com.example.codingInAction.aop.LoggingBeforeAdvice"/>
<bean id="loggingAfterAdvice" class="com.example.codingInAction.aop.LoggingAfterAdvice"/>
<bean id="loggingMethodInterceptor" class="com.example.codingInAction.aop.LoggingMethodInterceptor"/>
<bean id="userServiceProxy" class="org.springframework.aop.framework.ProxyFactoryBean">
<property name="target" ref="userService"/>
<property name="interceptorNames">
<list>
<value>loggingMethodInterceptor</value>
<value>loggingBeforeAdvice</value>
<value>loggingAfterAdvice</value>
</list>
</property>
<property name="proxyTargetClass" value="true"/>
</bean>
</beans>
|
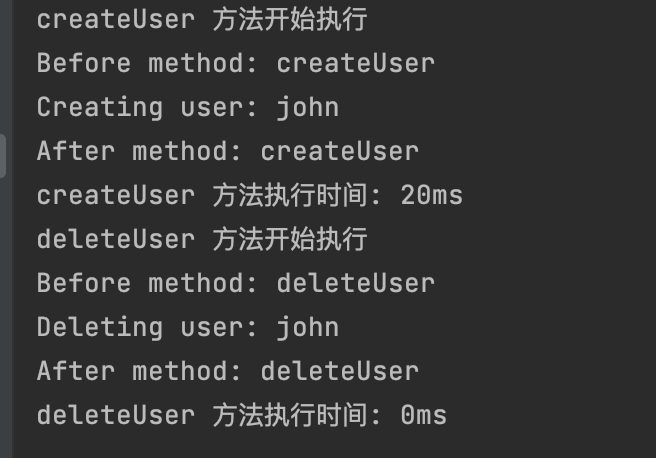
运行程序启动代码,可以得到如下截图
1
2
3
4
5
6
7
8
9
10
11
12
13
14
| public class CodingInActionApplication{
public static void main(String[] args) {
ApplicationContext context = new ClassPathXmlApplicationContext("applicationContext.xml");
UserService userService = (UserService) context.getBean("userServiceProxy");
userService.createUser("john");
userService.deleteUser("john");
}
}
|

以上xml 中的配置可以等价替换成如下代码,运行结果是一致的
1
2
3
4
5
6
7
8
9
10
11
12
13
14
15
16
17
18
19
20
21
| class UserServiceTest {
@Test
void createUser() {
UserService target = new UserService();
BeforeAdvice beforeAdvice = new LoggingBeforeAdvice();
AfterReturningAdvice afterAdvice = new LoggingAfterAdvice();
MethodInterceptor methodInterceptor = new LoggingMethodInterceptor();
ProxyFactory proxyFactory = new ProxyFactory();
proxyFactory.setTarget(target);
proxyFactory.addAdvice(methodInterceptor);
proxyFactory.addAdvice(beforeAdvice);
proxyFactory.addAdvice(afterAdvice);
UserService proxy = (UserService) proxyFactory.getProxy();
proxy.createUser("john");
proxy.deleteUser("john");
}
|
通过以上代码来简单介绍一下AOP 中的专业术语
2.1 连接点(Joinpoint)
连接点是程序执行中的某个特定点。Spring AOP中的连接点通常是方法的执行。例如,在UserService类中,createUser方法的执行就是一个连接点。连接点可以是类初始化、字段访问、方法调用等。
在UserService类中,方法createUser的执行是一个连接点。
1
2
3
| public void createUser(String username) {
System.out.println("Creating user: " + username);
}
|
2.2 增强(Advice)
通知是围绕连接点执行的代码。Spring AOP支持五种类型的通知:
- 前置增强(Before Advice):在方法执行之前执行。
- 后置增强(After Returning Advice):在方法成功执行之后执行。
- 异常增强(After Throwing Advice):在方法抛出异常后执行。
- 最终增强(After (finally) Advice):在方法执行之后,无论是否抛出异常都会执行。
- 环绕增强(Around Advice):在方法执行之前和之后执行。
在前面的代码示例中,就分别定义了前置增强、后置增强和环绕增强
2.3 织入 Advice
在前面的代码示例中,有连接点 joinpoint 和 增强 Advice,看运行结果我们可能注意到一个问题:Advice 增强被默认织入(weaving)了目标类(target)的所有方法中,即interceptorNames 中配置的拦截器会对目标对象userService中所有方法起作用,这是 因为没有定义具体的 Pointcut 来限制拦截范围。
1
2
3
4
5
6
7
8
9
10
11
12
13
14
15
16
|
<bean id="userServiceProxy" class="org.springframework.aop.framework.ProxyFactoryBean">
<property name="target" ref="userService"/>
<property name="interceptorNames">
<list>
<value>loggingMethodInterceptor</value>
<value>loggingBeforeAdvice</value>
<value>loggingAfterAdvice</value>
</list>
</property>
<property name="proxyTargetClass" value="true"/>
</bean>
|
为了更加灵活,更有选择地将增强 织入某些类的某些特定的方法中 ,可以定义 Pointcut 和 Advisor。这样可以明确地指定在哪些连接点 joinpoint 上应用Advice 增强。
2.3.1 Pointcut -接口实现
Pointcut 有不同的实现方式
- 可以是通过Pointcut接口实现
- 也可以是切点表达式
这一节内容先介绍接口实现方式, 后面自动代理机制部分再介绍表达式方式。
Spring通过org.springframework.aop.Pointcut接口描述切点, Pointcut 由ClassFilter和MethodMatcher构成,它通过ClassFilter定位到某些特定类上,通过MethodMatcher定位到某些特定方法上,这样Pointcut就拥有了描述某些类的某些特定方法的能力。
1
2
3
4
5
6
7
8
9
10
11
12
13
14
15
16
17
18
19
20
21
| public interface Pointcut {
ClassFilter getClassFilter();
MethodMatcher getMethodMatcher();
Pointcut TRUE = TruePointcut.INSTANCE;
}
|
我们可以定义一个Pointcut 匹配UserService.create方法。
1
2
3
4
5
6
7
8
9
10
11
12
13
14
15
16
17
18
19
20
21
22
23
24
25
26
27
28
29
30
31
32
33
34
| public class LoggingPointcut implements Pointcut {
@Override
public ClassFilter getClassFilter() {
return clazz -> clazz == UserService.class;
}
@Override
public MethodMatcher getMethodMatcher() {
return new MethodMatcher() {
@Override
public boolean matches(Method method, Class<?> targetClass) {
if (method.getName().equals("createUser")) {
return true;
}
return false;
}
@Override
public boolean isRuntime() {
return true;
}
@Override
public boolean matches(Method method, Class<?> targetClass, Object... args) {
if (method.getName().equals("createUser")) {
return true;
}
return false;
}
};
}
}
|
通过数据库查询的概念,可以这样来理解以上joinpoint、Advice、pointcut 3个概念。
连接点相当于数据库中的记录,而切点相当于查询条件。切点和连接点不是一对一的关系,一个切点可以匹配多个连接点。
根据每个查询条件 (切点 pointcut) 找到对应记录(连接点 Joinpoint )后,对记录执行的操作,相当于增强Advice
2.3.2 Advisor 切面
Advisor是一个非常重要的概念,它将切点(Pointcut)和增强(Advice)结合起来,形成一个切面(Aspect)。Advisor包含两个主要部分:
- Pointcut:定义在哪些连接点(通常是方法执行)上应用通知。
- Advice:定义在连接点上执行的具体操作,可以是在方法执行前、后或环绕方法执行。
在这里我们可以把上面例子中的环绕增强改成Advisor的形式,以给它增加“筛选条件” pointcut
1
2
3
4
5
6
7
8
9
10
11
12
13
14
15
| public class LoggingAdvisor implements PointcutAdvisor {
@Override
public Pointcut getPointcut() {
return new LoggingPointcut();
}
@Override
public Advice getAdvice() {
return new LoggingMethodInterceptor();
}
@Override
public boolean isPerInstance() {
return true;
}
}
|
修改applicationContext.xml
1
2
3
4
5
6
7
8
9
10
11
12
13
14
15
16
17
18
19
20
21
22
23
24
25
26
27
28
29
30
31
32
33
34
35
36
37
38
| <?xml version="1.0" encoding="UTF-8"?>
<beans xmlns="http://www.springframework.org/schema/beans"
xmlns:xsi="http://www.w3.org/2001/XMLSchema-instance"
xmlns:aop="http://www.springframework.org/schema/aop"
xsi:schemaLocation="http://www.springframework.org/schema/beans
http://www.springframework.org/schema/beans/spring-beans.xsd
http://www.springframework.org/schema/aop
http://www.springframework.org/schema/aop/spring-aop.xsd">
<bean id="userService" class="com.example.codingInAction.service.UserService"/>
<bean id="loggingBeforeAdvice" class="com.example.codingInAction.aop.LoggingBeforeAdvice"/>
<bean id="loggingAfterAdvice" class="com.example.codingInAction.aop.LoggingAfterAdvice"/>
<bean id="loggingAdvisor" class="com.example.codingInAction.aop.LoggingAdvisor"/>
<bean id="userServiceProxy" class="org.springframework.aop.framework.ProxyFactoryBean">
<property name="target" ref="userService"/>
<property name="interceptorNames">
<list>
<value>loggingAdvisor</value>
<value>loggingBeforeAdvice</value>
<value>loggingAfterAdvice</value>
</list>
</property>
<property name="proxyTargetClass" value="true"/>
</bean>
</beans>
|
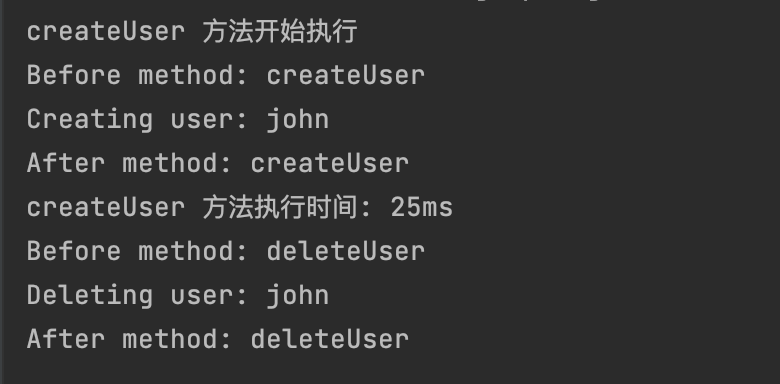
运行前面相同的启动代码,可以得到相同的运行结果。
可以看到,增加了“筛选条件”的环绕增强,如预期一样,如预期一样,环绕增强只在create方法上发挥了作用。
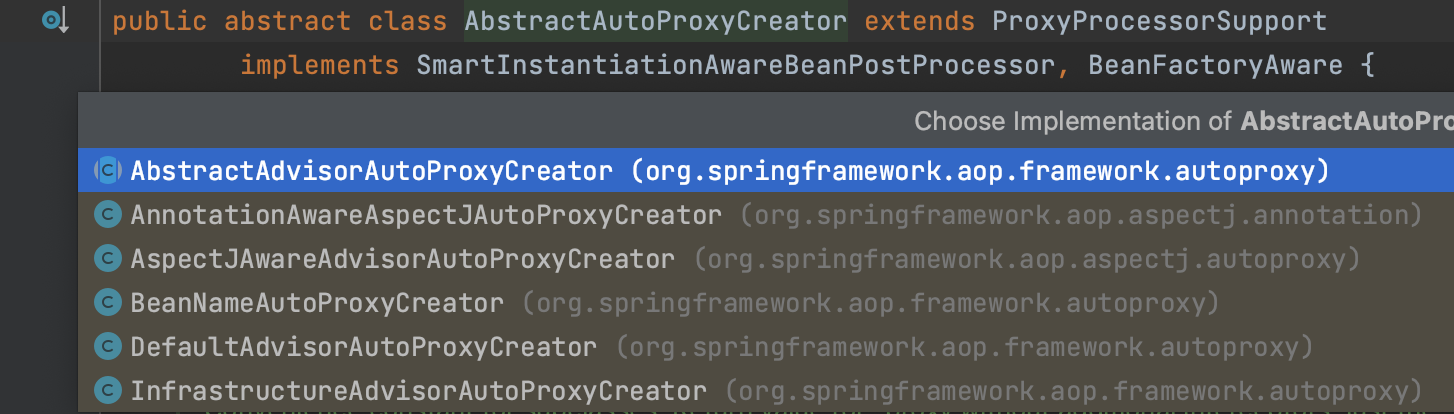
3. 自动代理机制-AbstractAutoProxyCreator
在以上 XML AOP 的实现中,每一个需要被代理的Bean都需要使用一个ProxyFactoryBean进行配置,,并在需要时手动获取代理对象以实现AOP功能。
然而,在大型生产环境中,这种配置方式显得繁琐且不切实际。为了解决这一问题,Spring提供了一种基于AbstractAutoProxyCreator的自动代理机制,使得我们无需为每个Bean手动配置ProxyFactoryBean。AbstractAutoProxyCreator通过自动检测Bean的类型和相应的切面(Aspect)来创建代理对象,从而简化了配置过程。
AbstractAutoProxyCreator 有很多子类,下面将介绍各个子类如何配置完成自动代理机制。
3.1 BeanNameAutoProxyCreator
使用 BeanNameAutoProxyCreator 后,你不再需要手动配置和获取 userServiceProxy 代理对象。Spring 会自动为指定的 Bean 创建代理对象。你只需要获取原始的 userService,Spring 会自动为它应用增强。
修改applicationContext.xml
1
2
3
4
5
6
7
8
9
10
11
12
13
14
15
16
17
18
19
20
21
22
23
24
25
26
27
28
29
30
31
32
33
34
35
| <?xml version="1.0" encoding="UTF-8"?>
<beans xmlns="http://www.springframework.org/schema/beans"
xmlns:xsi="http://www.w3.org/2001/XMLSchema-instance"
xmlns:aop="http://www.springframework.org/schema/aop"
xsi:schemaLocation="http://www.springframework.org/schema/beans
http://www.springframework.org/schema/beans/spring-beans.xsd
http://www.springframework.org/schema/aop
http://www.springframework.org/schema/aop/spring-aop.xsd">
<bean id="userService" class="com.example.codingInAction.service.UserService"/>
<bean id="loggingAdvisor" class="com.example.codingInAction.aop.LoggingAdvisor"/>
<bean id="loggingBeforeAdvice" class="com.example.codingInAction.aop.LoggingBeforeAdvice"/>
<bean id="loggingAfterAdvice" class="com.example.codingInAction.aop.LoggingAfterAdvice"/>
<bean class="org.springframework.aop.framework.autoproxy.BeanNameAutoProxyCreator">
<property name="beanNames">
<list>
<value>userService</value>
</list>
</property>
<property name="interceptorNames">
<list>
<value>loggingAdvisor</value>
<value>loggingBeforeAdvice</value>
<value>loggingAfterAdvice</value>
</list>
</property>
</bean>
</beans>
|
修改CodingInActionApplication,不再主动获取代理对象
1
2
3
4
5
6
7
8
9
10
11
12
13
14
15
16
17
| public class CodingInActionApplication {
public static void main(String[] args) {
ApplicationContext context = new ClassPathXmlApplicationContext("applicationContext.xml");
UserService userService = (UserService) context.getBean("userService");
userService.createUser("john");
userService.deleteUser("john");
}
}
|
运行启动代码,可以得到相同的运行结果
3.2 DefaultAdvisorAutoProxyCreator
AbstractAdvisorAutoProxyCreator 是 AbstractAutoProxyCreator 的直接子类,它扫描 Spring 容器中的所有 Advisor(一个 Advisor 包含一个 Advice 和一个 Pointcut),并根据 Pointcut 的匹配规则,自动为匹配的 Bean 创建代理对象,并应用对应的 Advice。
DefaultAdvisorAutoProxyCreator 是 AbstractAdvisorAutoProxyCreator 的具体实现类
我们简化下代码,只保留实现了Advisor 的环绕增强来看下运行结果
1
2
3
4
5
6
7
8
9
10
11
12
13
14
15
16
17
18
19
20
|
<?xml version="1.0" encoding="UTF-8"?>
<beans xmlns="http://www.springframework.org/schema/beans"
xmlns:xsi="http://www.w3.org/2001/XMLSchema-instance"
xmlns:aop="http://www.springframework.org/schema/aop"
xsi:schemaLocation="http://www.springframework.org/schema/beans
http://www.springframework.org/schema/beans/spring-beans.xsd
http://www.springframework.org/schema/aop
http://www.springframework.org/schema/aop/spring-aop.xsd"
<!-- 定义业务类的 Bean -->
<bean id="userService" class="com.example.codingInAction.service.UserService"/>
<bean id="loggingAdvisor" class="com.example.codingInAction.aop.LoggingAdvisor"/>
<bean class="org.springframework.aop.framework.autoproxy.DefaultAdvisorAutoProxyCreator"/>
</beans>
|
运行和上面一样的CodingInActionApplication, 可以得到如下结果
3.3 基于AspectJ 实现的自动代理
终于来到日常开发中, 最常见的AOP 配置方式了,基于AspectJ 注解的方式。
以上提到的所有AOP 配置方式中,不论是使用手动配置的ProxyFactoryBean,还是自动代理的BeanNameAutoProxyCreator、DefaultAdvisorAutoProxyCreator,都需要实现Pointcut和Advice接口描述切点和增强,并用Advisor整合两者。
AspectJ则采用注解来描述切点、增强。
两者只是表述方式不同,描述内容的本质是完全相同的,这就好比一个用中文、一个用英文讲述同一个伊索寓言一样。
AspectJ 是一个强大的面向切面编程(AOP)框架,独立于 Spring 但可以无缝集成。
3.3.1 AspectJAwareAdvisorAutoProxyCreator
AspectJAwareAdvisorAutoProxyCreator是 AbstractAdvisorAutoProxyCreator 的子类,主要用于处理基于 AspectJ 方式的 AOP 配置。
它和 AnnotationAwareAspectJAutoProxyCreator 类似,但主要用于处理通过 XML 配置文件或其他非注解方式配置的 AspectJ 切面。
3.3.2 AnnotationAwareAspectJAutoProxyCreator
AnnotationAwareAspectJAutoProxyCreator是AspectJAwareAdvisorAutoProxyCreator 的子类。
AnnotationAwareAspectJAutoProxyCreator 扫描使用了 AspectJ 注解(如 @Aspect、@Before、@After 等)的 Bean,并将这些注解配置的切面应用到匹配的 Bean 上。
pointcut-切点表达式
定义一个 LoggingAspect
1
2
3
4
5
6
7
8
9
10
11
12
13
14
15
16
17
18
19
20
21
22
23
24
25
26
27
28
29
30
31
32
33
34
35
36
37
38
|
import org.aspectj.lang.ProceedingJoinPoint;
import org.aspectj.lang.annotation.*;
import org.aspectj.lang.JoinPoint;
@Aspect
public class LoggingAspect {
@Pointcut("execution(* com.example.codingInAction.service.UserService.*(..))")
public void userServiceAllMethod() {
}
@Before("userServiceAllMethod()")
public void logBefore(JoinPoint joinPoint) {
System.out.println("Before method: " + joinPoint.getSignature().getName());
}
@After("userServiceAllMethod()")
public void logAfter(JoinPoint joinPoint) {
System.out.println("After method: " + joinPoint.getSignature().getName());
}
@Around("execution(* com.example.codingInAction.service.UserService.createUser(..))")
public Object logAround(ProceedingJoinPoint joinPoint) throws Throwable {
long startTime = System.currentTimeMillis();
System.out.println(joinPoint.getSignature().getName() + " 方法开始执行");
Object result = joinPoint.proceed();
long endTime = System.currentTimeMillis();
System.out.println(joinPoint.getSignature().getName() + " 方法执行时间: " + (endTime - startTime) + "ms");
return result;
}
}
|
借一张来描述下各个部分的使用方式和含义
修改applicationContext.xml,并运行启动代码,运行结果依然和之前保持一致。
1
2
3
4
5
6
7
8
9
10
11
12
13
14
15
16
17
18
19
20
21
22
23
| <?xml version="1.0" encoding="UTF-8"?>
<beans xmlns="http://www.springframework.org/schema/beans"
xmlns:xsi="http://www.w3.org/2001/XMLSchema-instance"
xmlns:aop="http://www.springframework.org/schema/aop"
xmlns:context="http://www.springframework.org/schema/context"
xsi:schemaLocation="http://www.springframework.org/schema/beans
http://www.springframework.org/schema/beans/spring-beans.xsd
http://www.springframework.org/schema/aop
http://www.springframework.org/schema/aop/spring-aop.xsd
http://www.springframework.org/schema/context
http://www.springframework.org/schema/context/spring-context.xsd">
<aop:aspectj-autoproxy/>
<bean id="userService" class="com.example.codingInAction.service.UserService"/>
<bean id="loggingAspect" class="com.example.codingInAction.aop.LoggingAspect"/>
</beans>
|
4. 自动代理机制-基于Schema配置切面
如果项目不能使用JDK 5.0,那么就无法使用基于@AspectJ注解的切面了。但是使用AspectJ切点表达式的大门依旧向我们敞开着,因为Spring提供了基于Schema配置的方法,它完全可以替代基于@AspectJ注解声明切面的方式。
依然是做同一件事的两种不同表达形式
在Spring的XML配置中,<aop:config>标签可以直接定义切点和通知,并将它们应用到目标对象上。这种方式简化了配置,不需要额外的Java类来定义Pointcut和Advisor。
1
2
3
4
5
6
7
8
9
10
11
12
13
14
15
16
17
18
19
20
21
22
23
24
25
26
27
28
29
30
31
32
33
34
35
36
37
| <?xml version="1.0" encoding="UTF-8"?>
<beans xmlns="http://www.springframework.org/schema/beans"
xmlns:xsi="http://www.w3.org/2001/XMLSchema-instance"
xmlns:aop="http://www.springframework.org/schema/aop"
xsi:schemaLocation="http://www.springframework.org/schema/beans
http://www.springframework.org/schema/beans/spring-beans.xsd
http://www.springframework.org/schema/aop
http://www.springframework.org/schema/aop/spring-aop.xsd">
<bean id="userService" class="com.example.codingInAction.service.UserService"/>
<bean id="loggingBeforeAdvice" class="com.example.codingInAction.aop.LoggingBeforeAdvice"/>
<bean id="loggingAfterAdvice" class="com.example.codingInAction.aop.LoggingAfterAdvice"/>
<bean id="loggingMethodInterceptor" class="com.example.codingInAction.aop.LoggingMethodInterceptor"/>
<aop:config>
<aop:pointcut id="userServiceMethods"
expression="execution(* com.example.codingInAction.service.UserService.*(..))"/>
<aop:pointcut id="userServiceCreateMethod"
expression="execution(* com.example.codingInAction.service.UserService.createUser(..))"/>
<aop:advisor advice-ref="loggingMethodInterceptor" pointcut-ref="userServiceCreateMethod"/>
<aop:advisor advice-ref="loggingBeforeAdvice" pointcut-ref="userServiceMethods"/>
<aop:advisor advice-ref="loggingAfterAdvice" pointcut-ref="userServiceMethods"/>
</aop:config>
</beans>
|
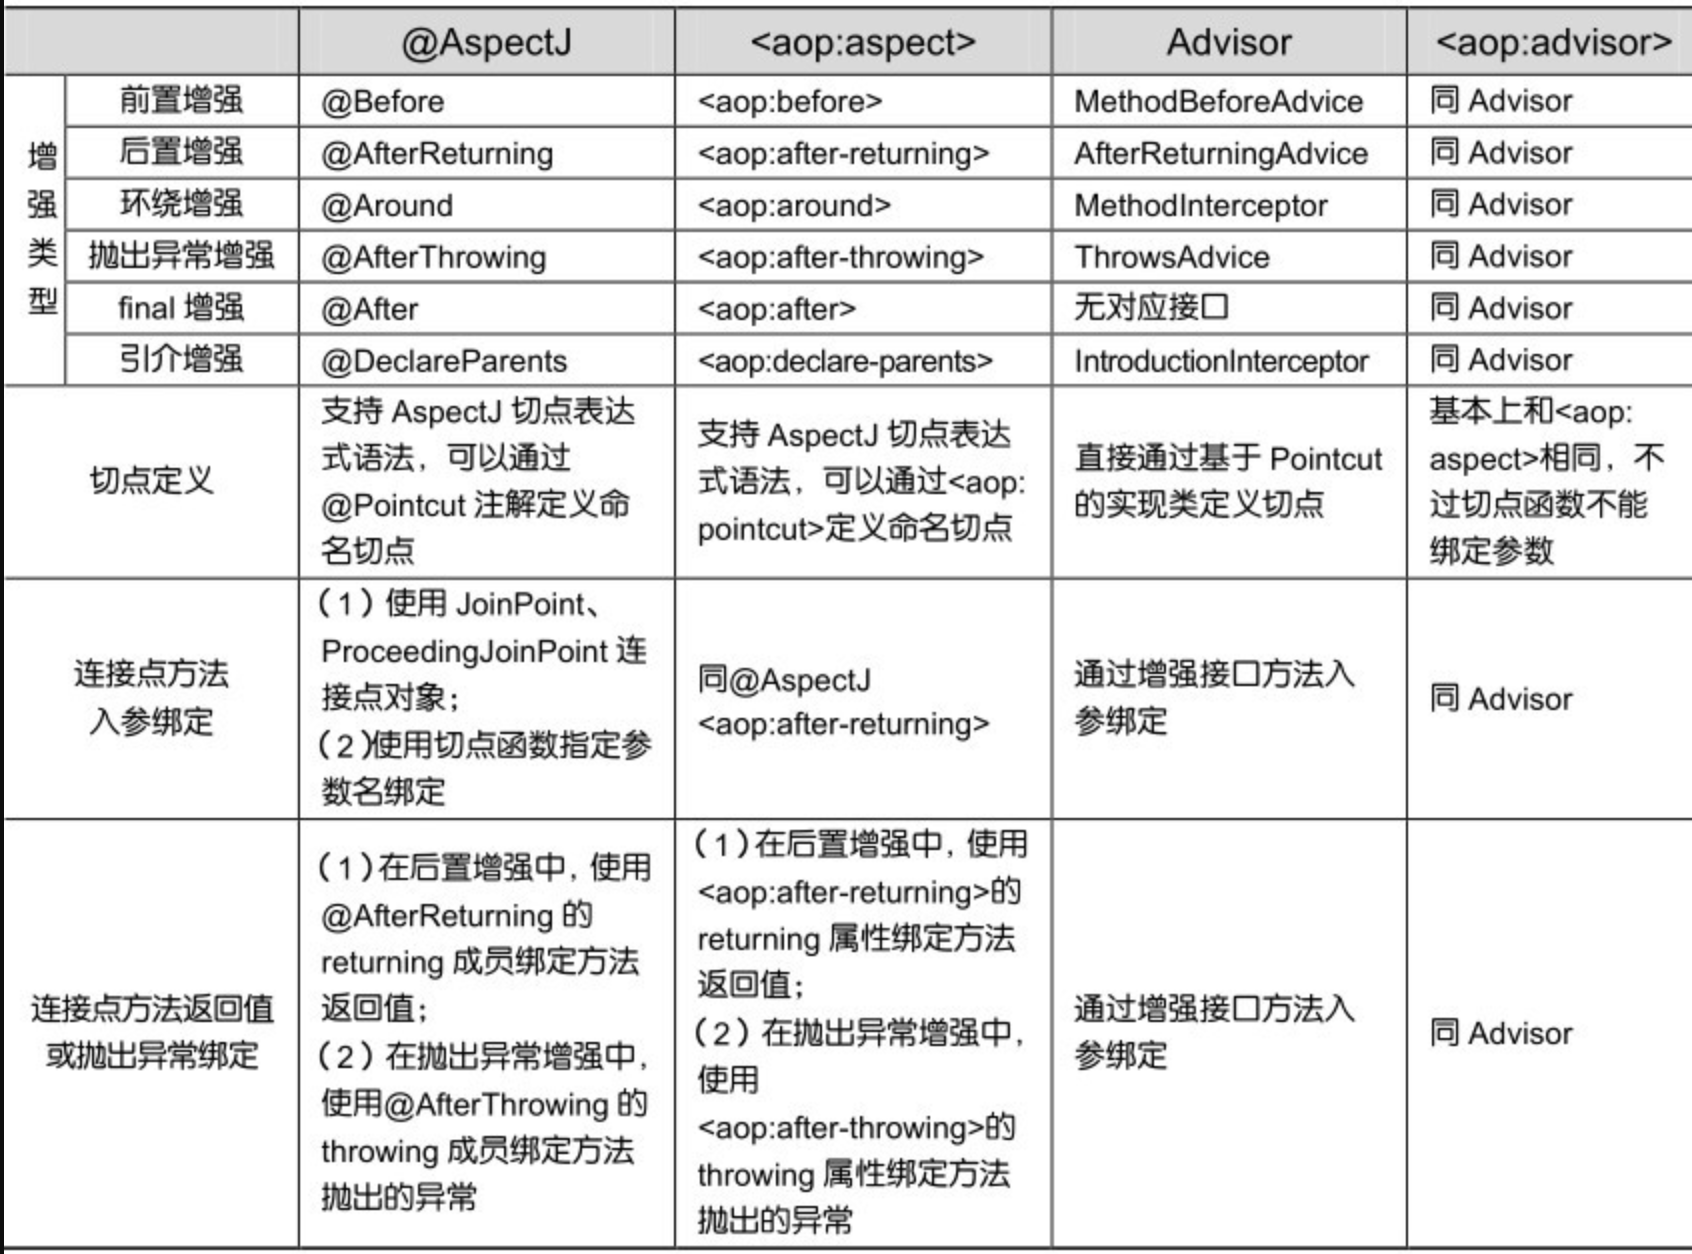
5.切面类型总结
根据以上代码扩充并总结下切面类型