1.单独使用MyBatis
在了解Spring 继承Mybatis 之前,先来看下如何单独使用MyBatis
数据表结构1
2
3
4
5
6
7
8
9
10CREATE TABLE message (
id bigint unsigned NOT NULL AUTO_INCREMENT,
message_key VARCHAR(255) COMMENT '消息唯一键,用于做回查的标识',
message text COMMENT '消息内容',
message_status INT DEFAULT 1 COMMENT '消息状态 1-prepare 2-commit 3-rollback 4-unknown',
create_time DATETIME NOT NULL DEFAULT CURRENT_TIMESTAMP,
update_time DATETIME NOT NULL DEFAULT CURRENT_TIMESTAMP ON UPDATE CURRENT_TIMESTAMP,
PRIMARY KEY (id),
UNIQUE INDEX idx_messageKey(message_key)
) ENGINE=InnoDB;
mybatis-config.xml
1 |
|
mappers/MessageMapper.xml1
2
3
4
5
6
7
8
9
10
11
12
13
14
15
16
17
18
19
20
21
22
23
24
25
26
27
28
29
30
31
32
33
34
35
36
<mapper namespace="com.example.codingInAction.mapper.MessageMapper">
<!-- 插入操作 插入数据后获取自动生成的主键 -->
<insert id="insertMessage" parameterType="com.example.codingInAction.model.Message"
useGeneratedKeys="true" keyProperty="id">
INSERT INTO message (
message,
message_key,
message_status
) VALUES (
#{message},
#{messageKey},
#{messageStatus}
)
</insert>
<select id="findByMessageKey" resultType="com.example.codingInAction.model.Message">
SELECT
id,
message AS message,
message_key AS "messageKey",
message_status AS "messageStatus",
create_time AS "createTime",
update_time AS "updateTime"
FROM
message
WHERE
message_key = #{messageKey}
</select>
</mapper>
1 | public class Message { |
1.1 SqlSessionFactory
SqlSessionFactory是MyBatis的核心, 其作用如下
- 创建
SqlSession对象:SqlSessionFactory通过其方法创建SqlSession实例。SqlSession用于执行数据库操作,如查询、插入、更新和删除等。每次需要进行数据库操作时,都会从SqlSessionFactory中获取一个新的SqlSession对象。 - 管理
SqlSession生命周期:SqlSessionFactory不仅负责创建SqlSession,还负责管理其生命周期,包括资源的分配和释放。SqlSession对象需要在操作完成后关闭,以释放数据库连接等资源。 - 加载和解析配置:
SqlSessionFactory在初始化时会加载和解析MyBatis的配置文件(如mybatis-config.xml)和Mapper XML文件。这些配置文件定义了数据库连接、事务管理、Mapper映射等信息。 - 缓存机制:
SqlSessionFactory配置中可以包含缓存设置,如一级缓存和二级缓存。缓存机制可以提高数据库访问的性能,减少重复查询的开销。
1.2 SqlSession
1 | SqlSession sqlSession = sqlSessionFactory.openSession(); |
SqlSession 是 MyBatis 与数据库交互的核心。
通过 SqlSession,开发者可以执行 SQL 语句、获取映射器(Mapper)、管理事务等操作。可以将 SqlSession 看作是 MyBatis 的会话,类似于 JDBC 中的 Connection 对象。
1.3 mapper 动态代理
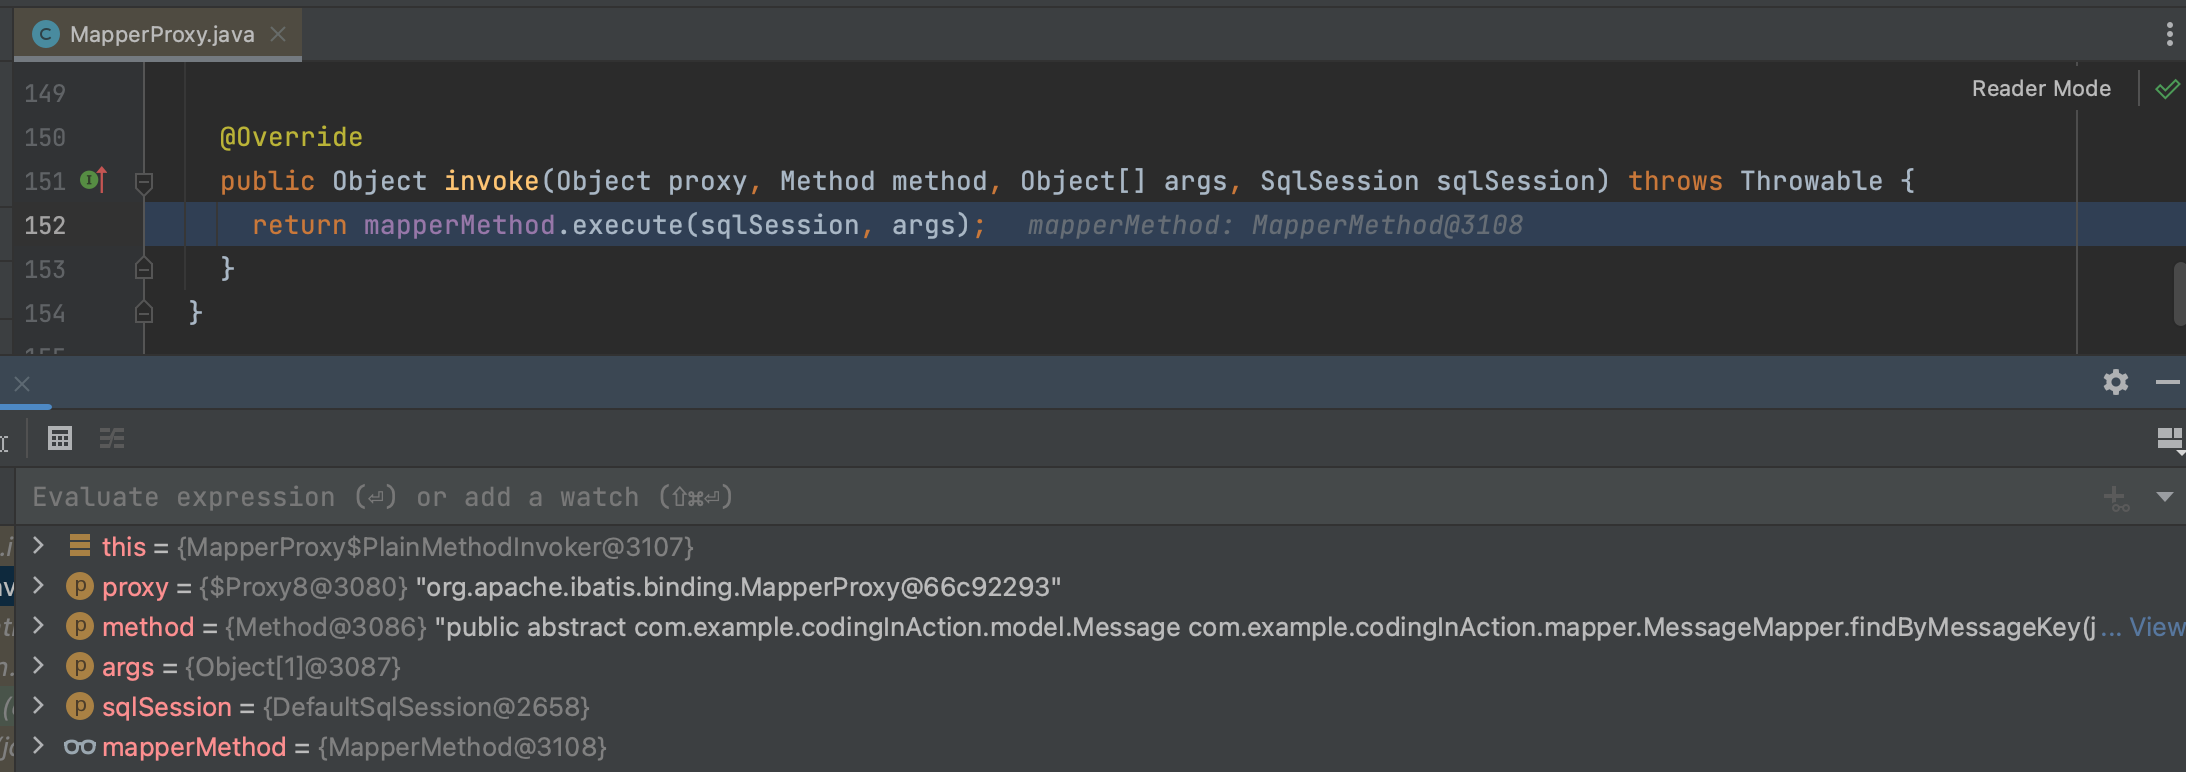
1 | MessageMapper messageMapper = sqlSession.getMapper(MessageMapper.class) |
以下代码获取到的是MessageMapper的动态代理对象
1 | public class DefaultSqlSession implements SqlSession { |
Configuration 对象对应的就是mybatis-config.xml 这个配置文件,层层深入源码最后发现是熟悉的JDK 动态代理Proxy.newProxyInstance, 说明最后生成的mapper 对象是一个JDK 动态代理对象。
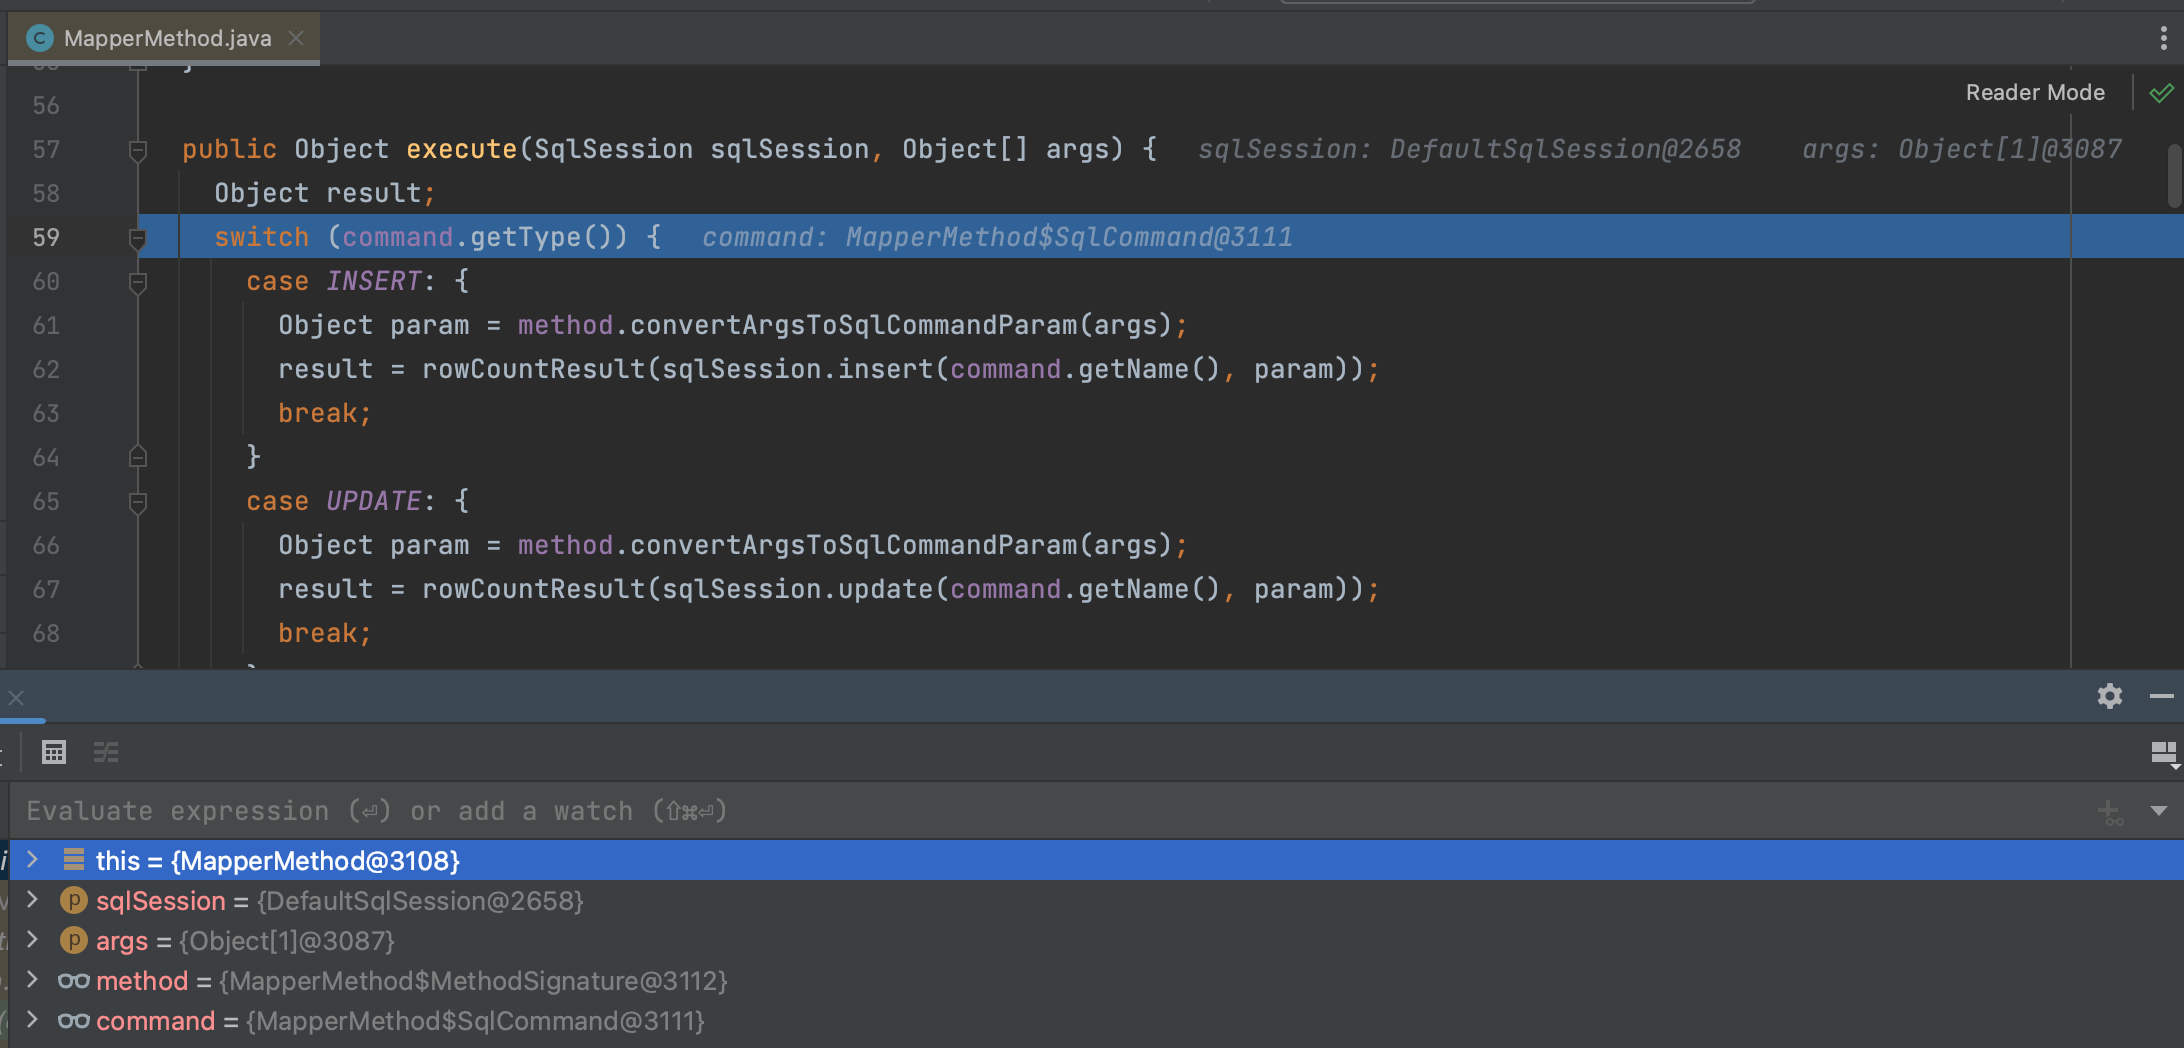
1.4 SQL执行
再看MapperProxyFactory.newInstance 源码,
1 | public class MapperProxyFactory<T> { |
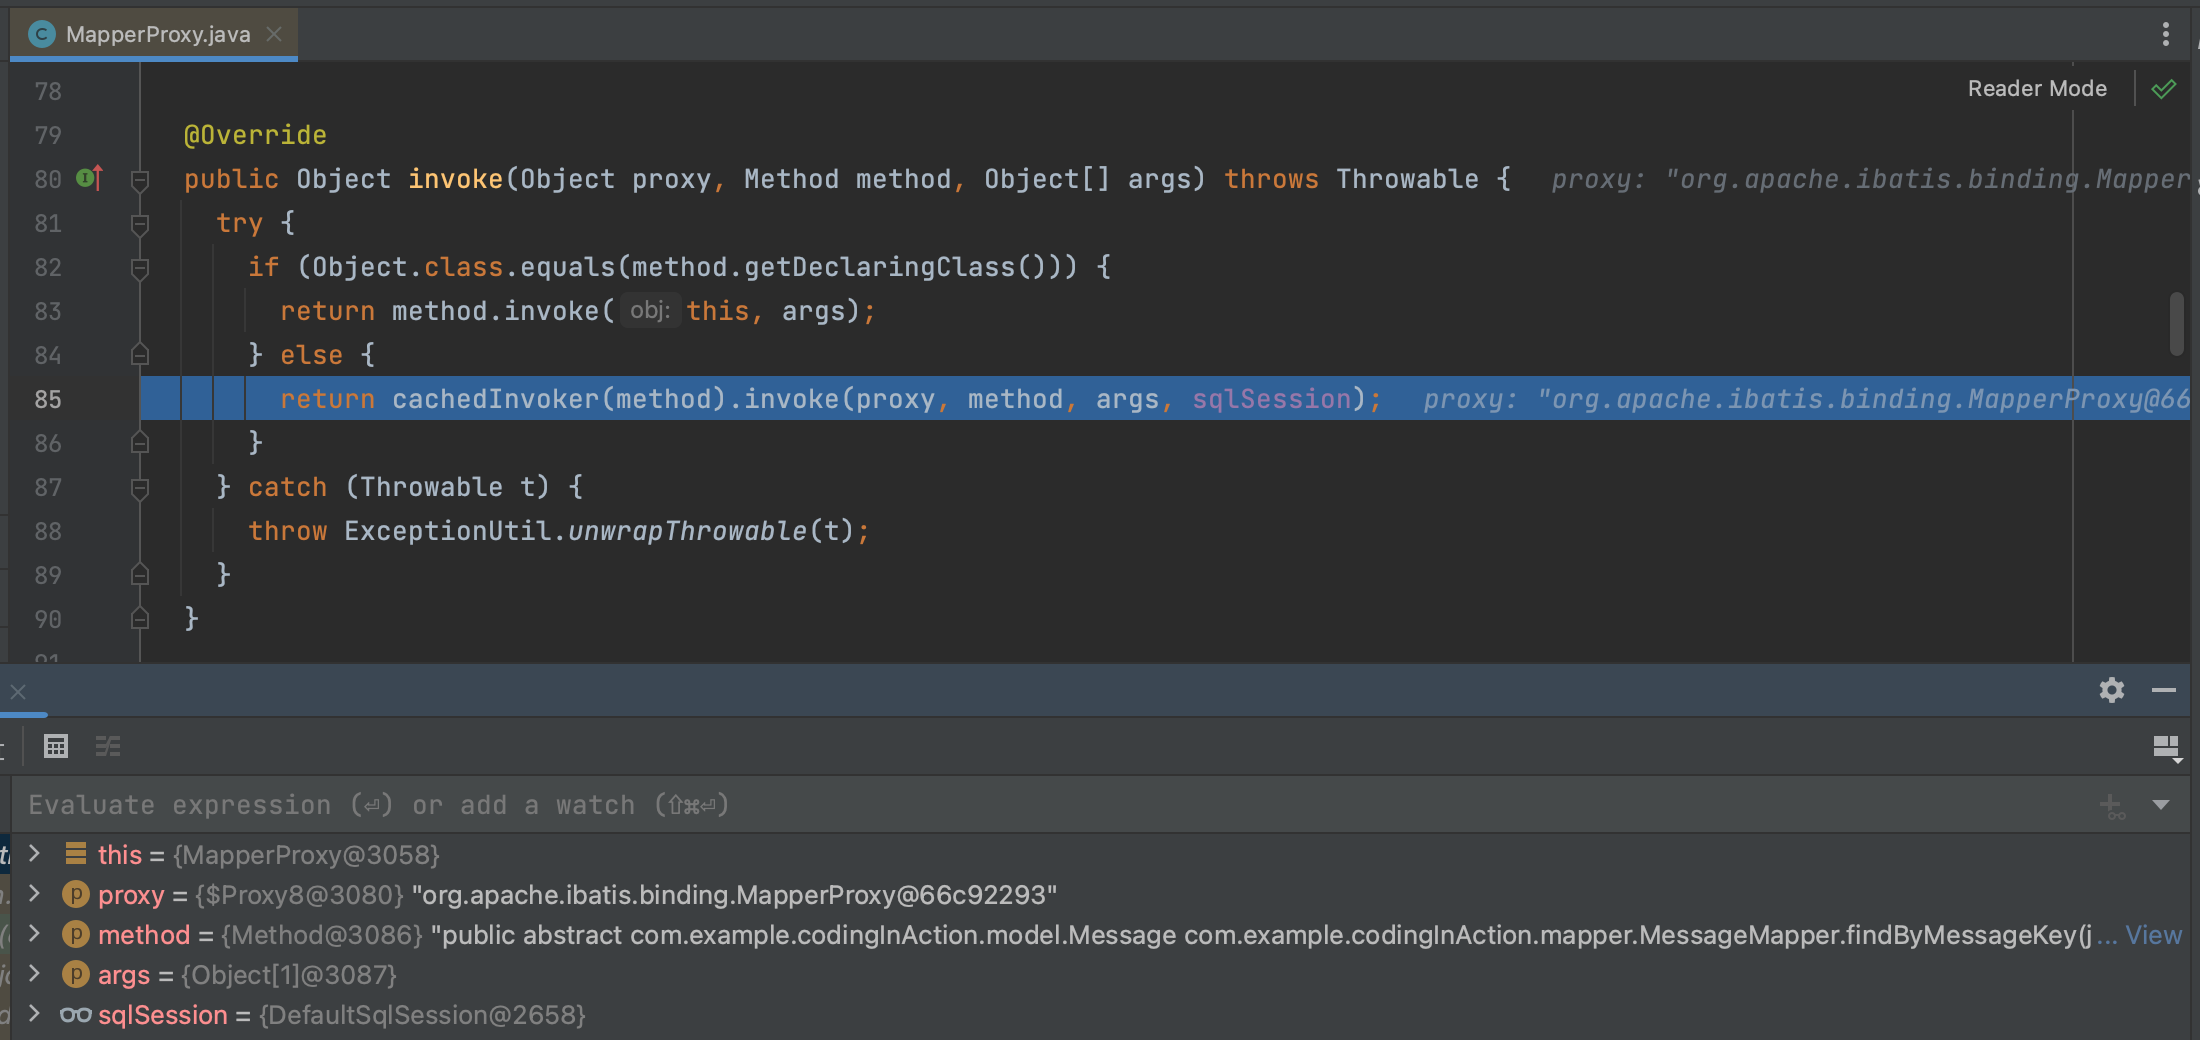
Proxy.newProxyInstance中参数InvocationHandler 传入的是MapperProxy, 看一下MapperProxy实现InvocationHandler 的具体逻辑
1 | public class MapperProxy<T> implements InvocationHandler, Serializable { |
2. Spring集成MyBatis
在MyBatis与Spring集成时,可以将MyBatis的配置直接放在Spring的配置文件(如applicationContext.xml)中,从而简化配置管理。通过这种方式,可以在一个配置文件中集中管理数据源、事务管理、MyBatis的SqlSessionFactory和Mapper扫描等配置。
applicationContext.xml
1 |
|
Spring整合MyBatis的优势主要在于使用上,我们来看看Spring中使用MyBatis的用法。 测试中我们看到,在Spring中使用MyBatis非常方便,用户甚至无法察觉自己正在使用MyBatis,而这一切相对于独立使用MyBatis时必须要做的各种冗余操作来说无非是大大简化了我们的工作量。
就是从Spring 容器中获取想要的mapper bean, 然后就可以执行对应的SQL 操作了1
2
3
4
5
6
7
8
9
10
11
12class MessageMapperTest {
void messageTest2() {
ApplicationContext context = new ClassPathXmlApplicationContext("applicationContext.xml");
MessageMapper messageMapper = (MessageMapper) context.getBean("messageMapper");
Map<String, Object> params = new HashMap<>();
params.put("messageKey", "test key");
Message result = messageMapper.findByMessageKey(params);
System.out.println(result.getMessage());
}
}
2.1 SqlSessionFactoryBean
从配置文件中可以看到, sqlSessionFactory 是通过SqlSessionFactoryBean配置的。
通过Spring配置SqlSessionFactoryBean,可以将SqlSessionFactory作为Spring的一个Bean进行管理。
1 | public class SqlSessionFactoryBean |
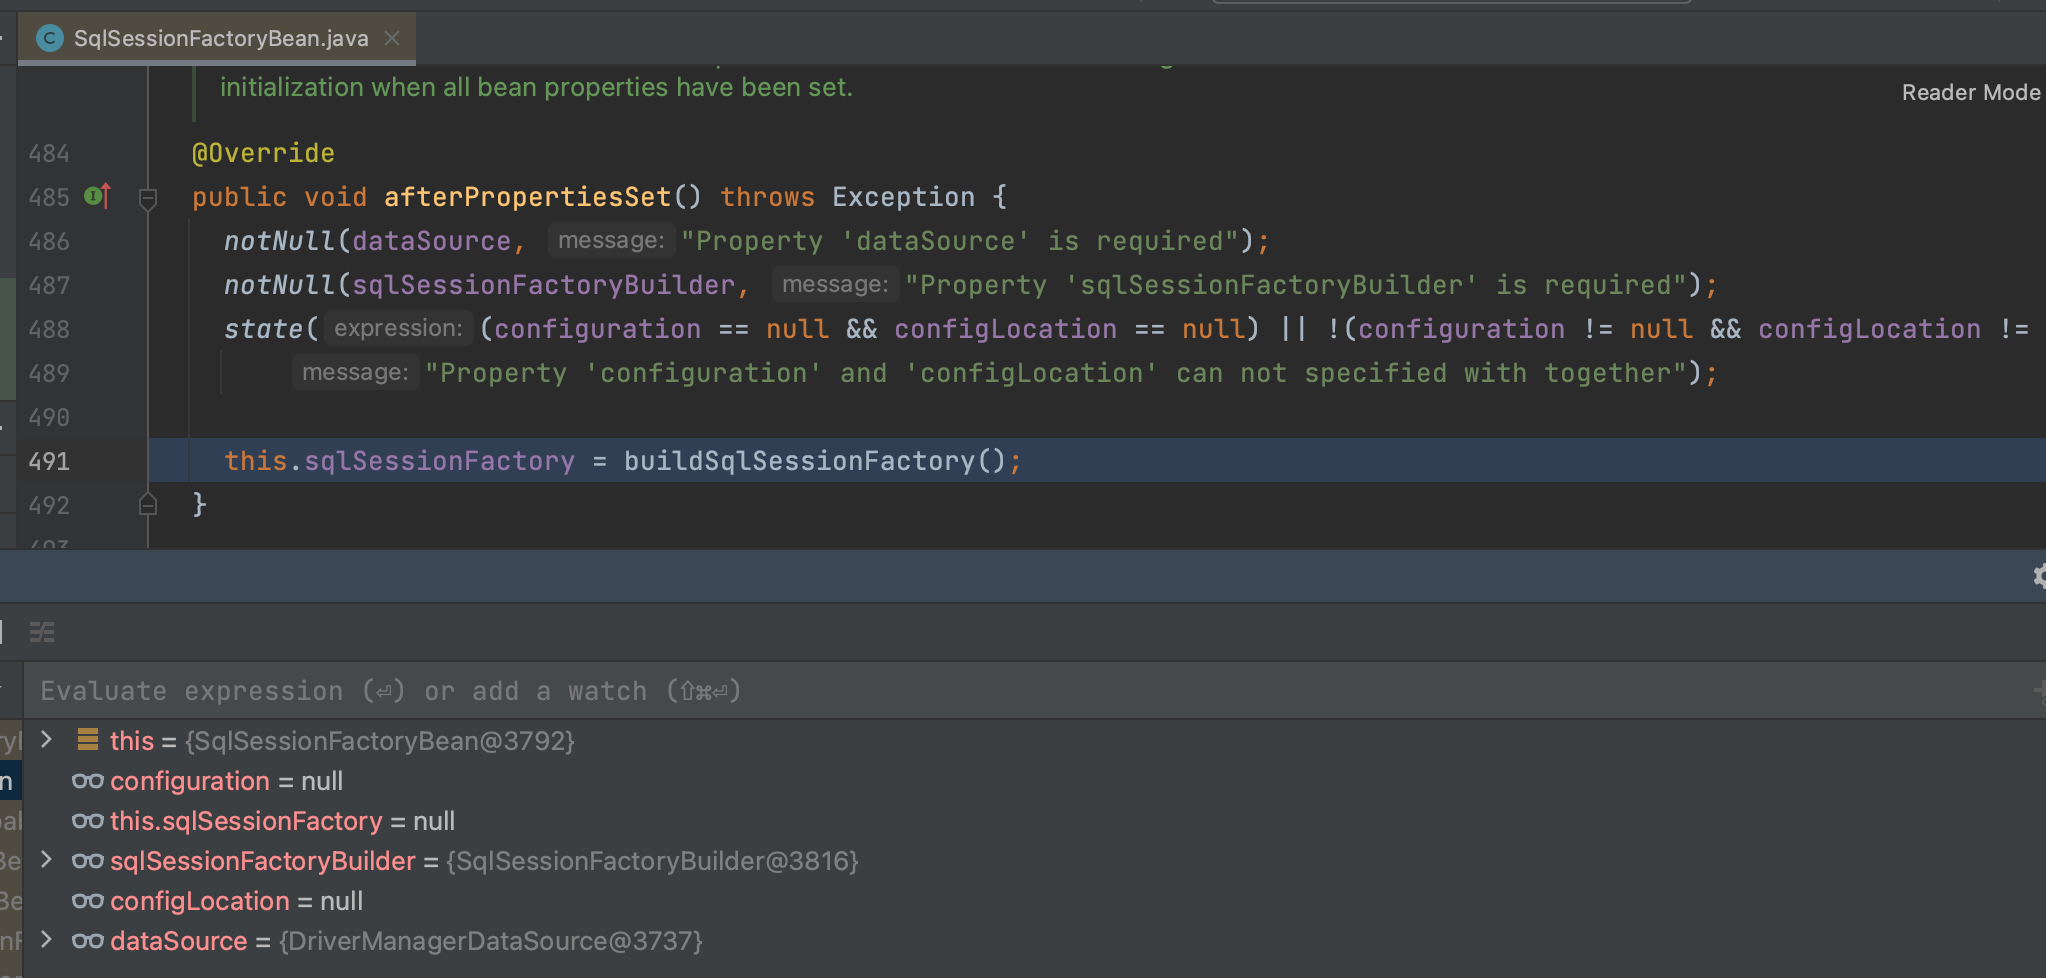
SqlSessionFactoryBean 实现了InitializingBean和FactoryBean两个接口
2.1.1 InitializingBean
实现此接口的bean会在初始化时调用重写的InitializingBean.afterPropertiesSet方法来进行bean的逻辑初始化
获取SqlSessionFactoryBean实例,跳过getBean 的其他代码直接来到init 阶段, InitionlizingBean 相关的逻辑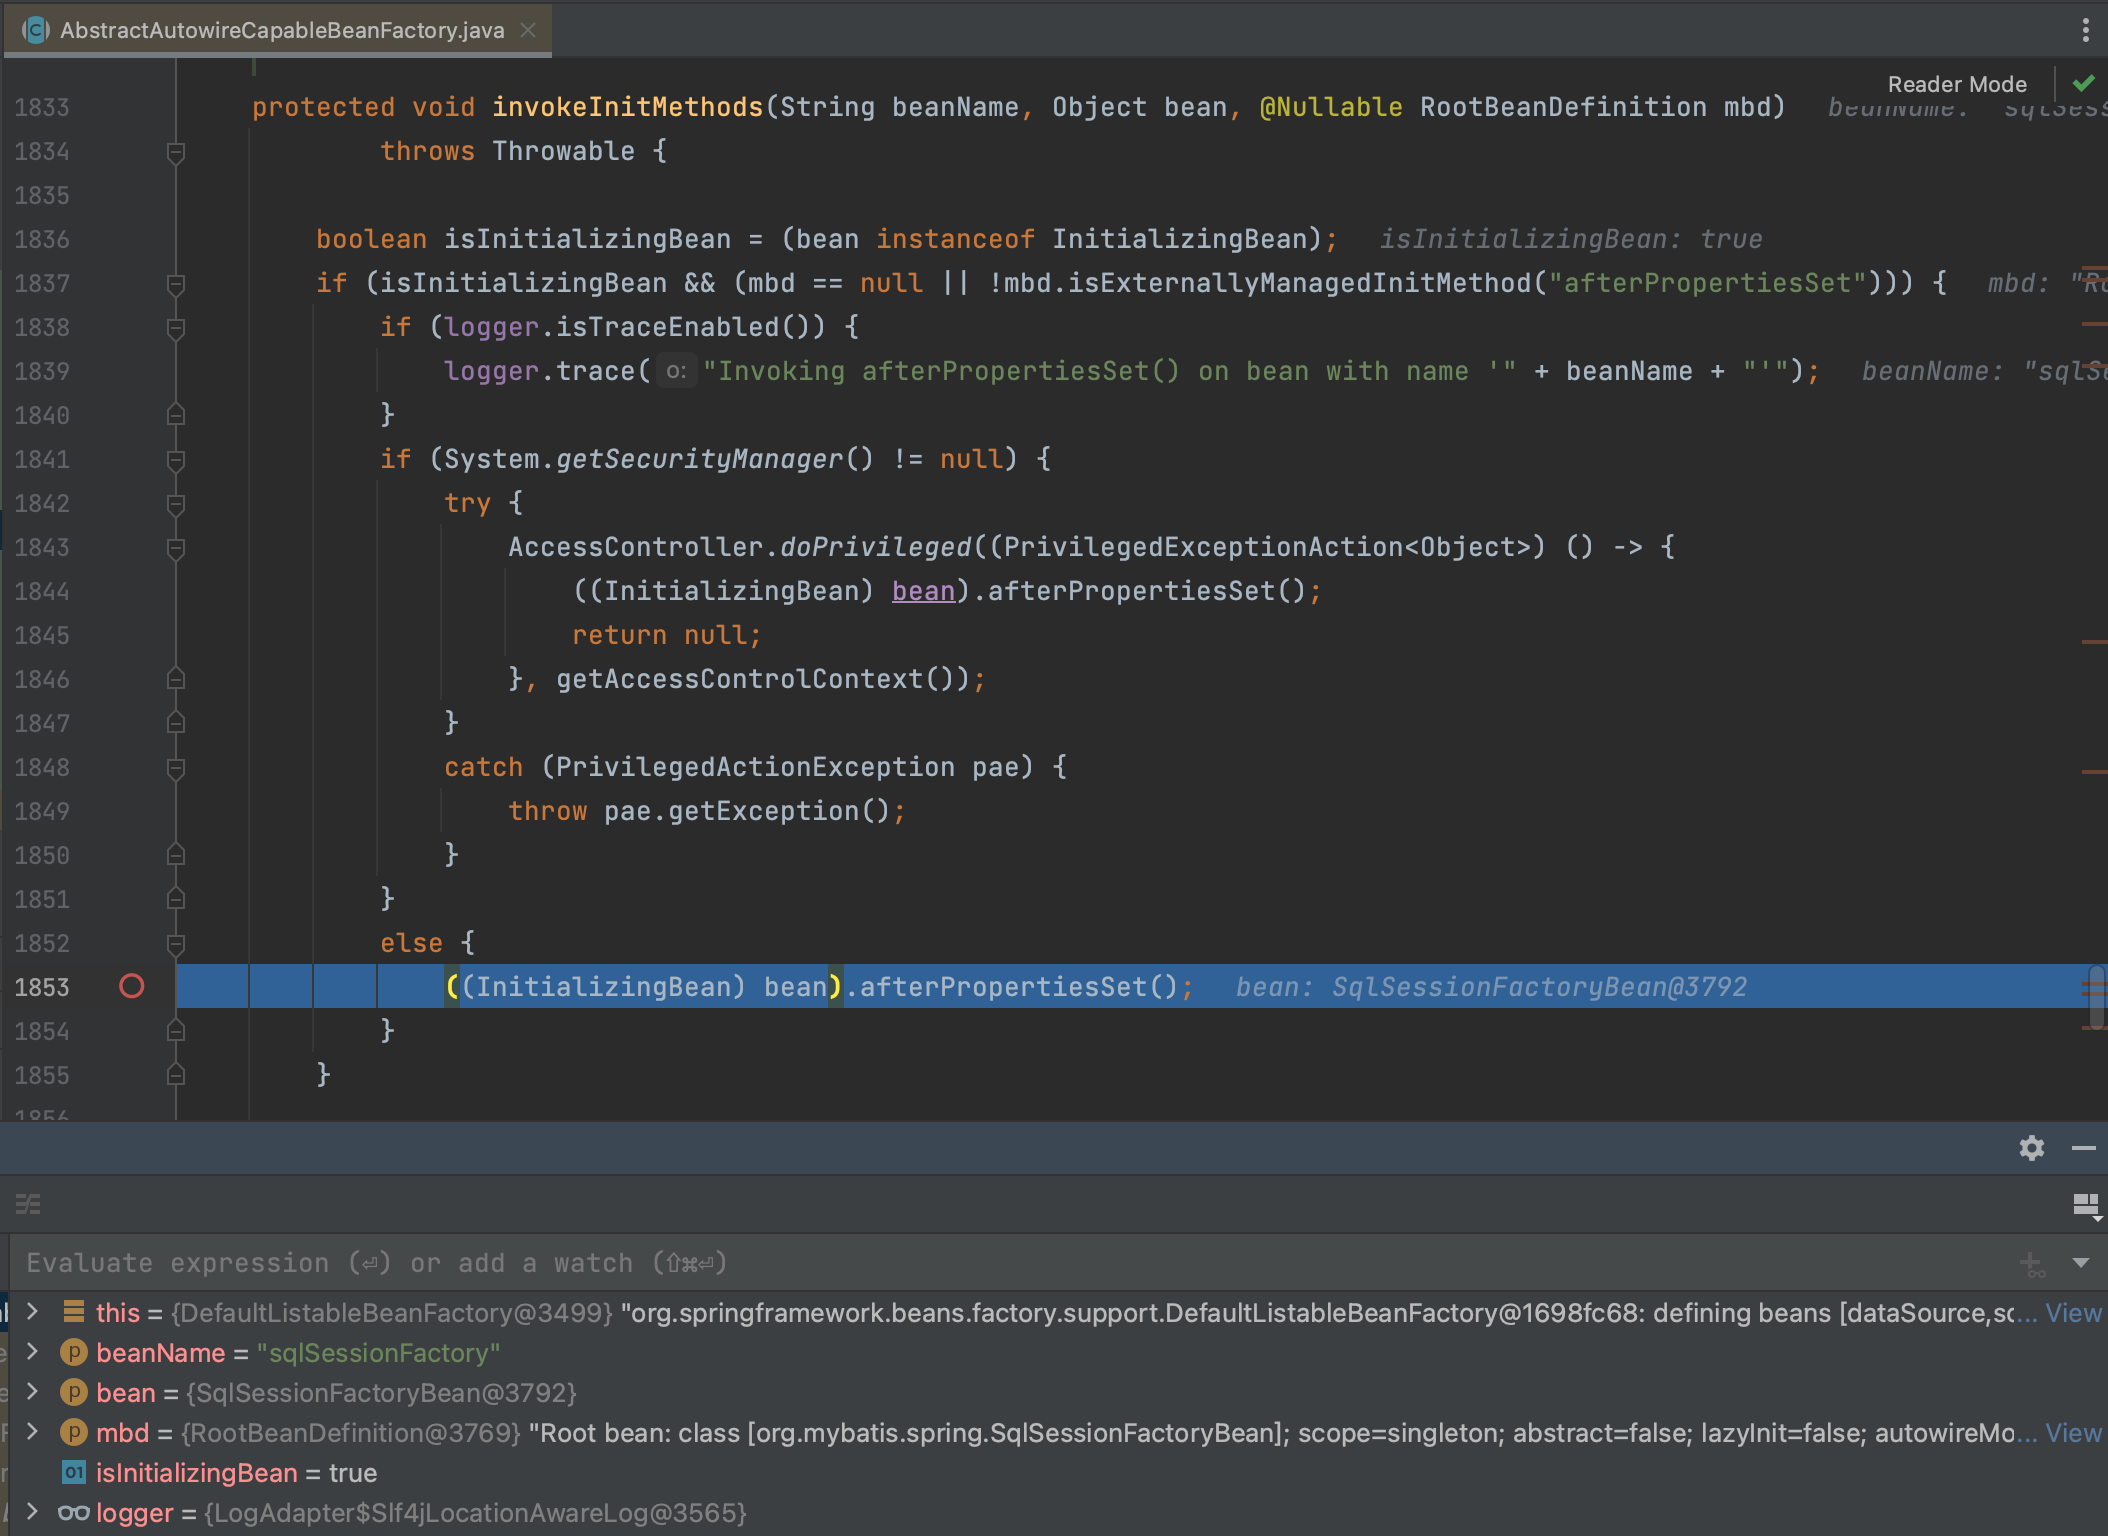
2.1.2 FactoryBean
在SqlSessionFactoryBean.getObject() 中就是把init 阶段实例化的SqlSessonFactory实例返回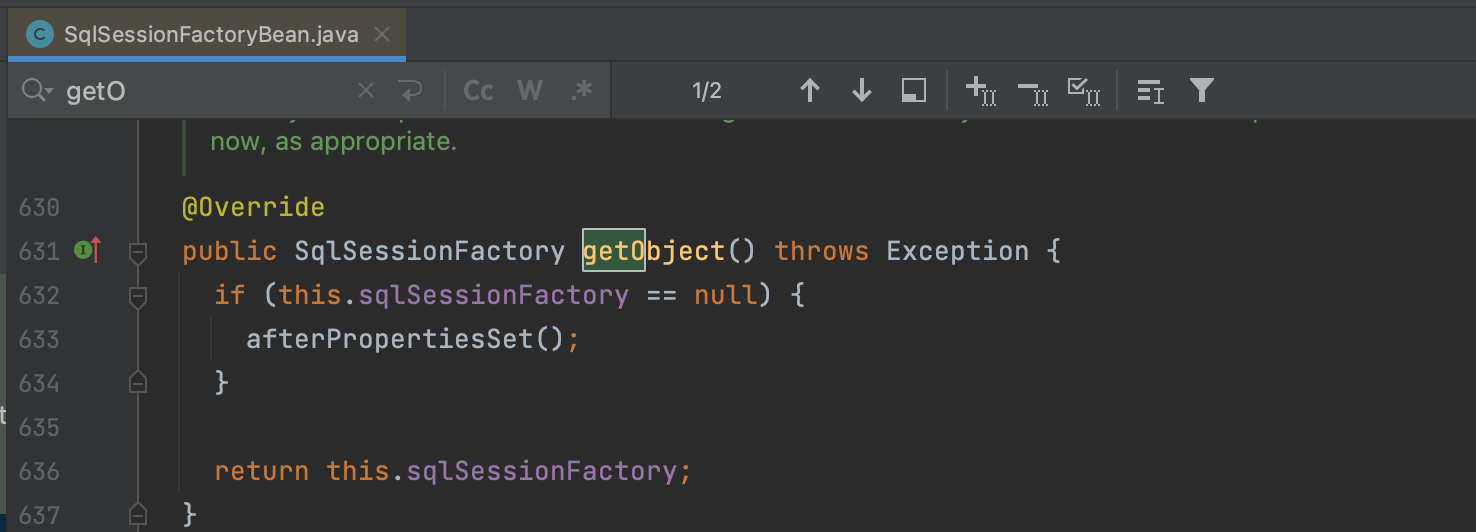
2.2 MapperFactoryBean
1 | MessageMapper messageMapper = (MessageMapper) context.getBean("messageMapper"); |
从配置文件中可以看到,messageMapper对应的MessageFactoryBean 也是一个FactoryBean, 重点看下getObject方法
1 | public class MapperFactoryBean<T> extends SqlSessionDaoSupport implements FactoryBean<T> { |
Spring中获取的名为messageMapper的bean,其实是与单独使用MyBatis完成了一样的功能,从源码上看,在bean的创建过程也是使用了MyBatis中的原生方法sqlSession.getMapper(MessageMapper.class)进行了再一次封装。
和不集成直接使用MyBatis 获取对应mapper实例其实本质上是一样的逻辑,从getMapper 进去 是完全一样的JDK 动态代理逻辑1
MessageMapper messageMapper = sqlSession.getMapper(MessageMapper.class);
2.2 MapperScannerConfigurer
在Spring项目中,通过MapperScannerConfigurer类自动扫描所有的Mapper接口,并通过Spring的依赖注入机制直接使用这些接口,是一种简化并推荐的方式。这种方法不需要开发者手动实现Mapper接口的具体方法,也不需要手动管理SqlSession,从而大大简化了代码和配置。
1 | <!-- MyBatis MapperScannerConfigurer配置 --> |
3. Spring Boot集成MyBatis
在Spring Boot项目中集成MyBatis通常使用mybatis-spring-boot-starter,这个由MyBatis 提供的Starter简化了配置和集成过程。使用Spring Boot集成MyBatis时,你不需要显式地配置SqlSessionFactoryBean,通过SpringBoot 的自动配置机制, 这些配置均可以自动完成。你只需要
- 添加依赖
- 在application.properties 中配置DataSource 即可
1 | <!-- MyBatis Spring Boot Starter --> |
关于SpringBoot 自动配置机制的实现原理,可以点击Spring boot 自动配置实现原理阅读了解。 下面将忽略MybatisAutoConfiguration配置的加载和BeanDefinition 注册流程,直接进入实例化过程进行分析
3.1 MybatisAutoConfiguration的实例化
org.mybatis.spring.boot.autoconfigure.MybatisAutoConfiguration
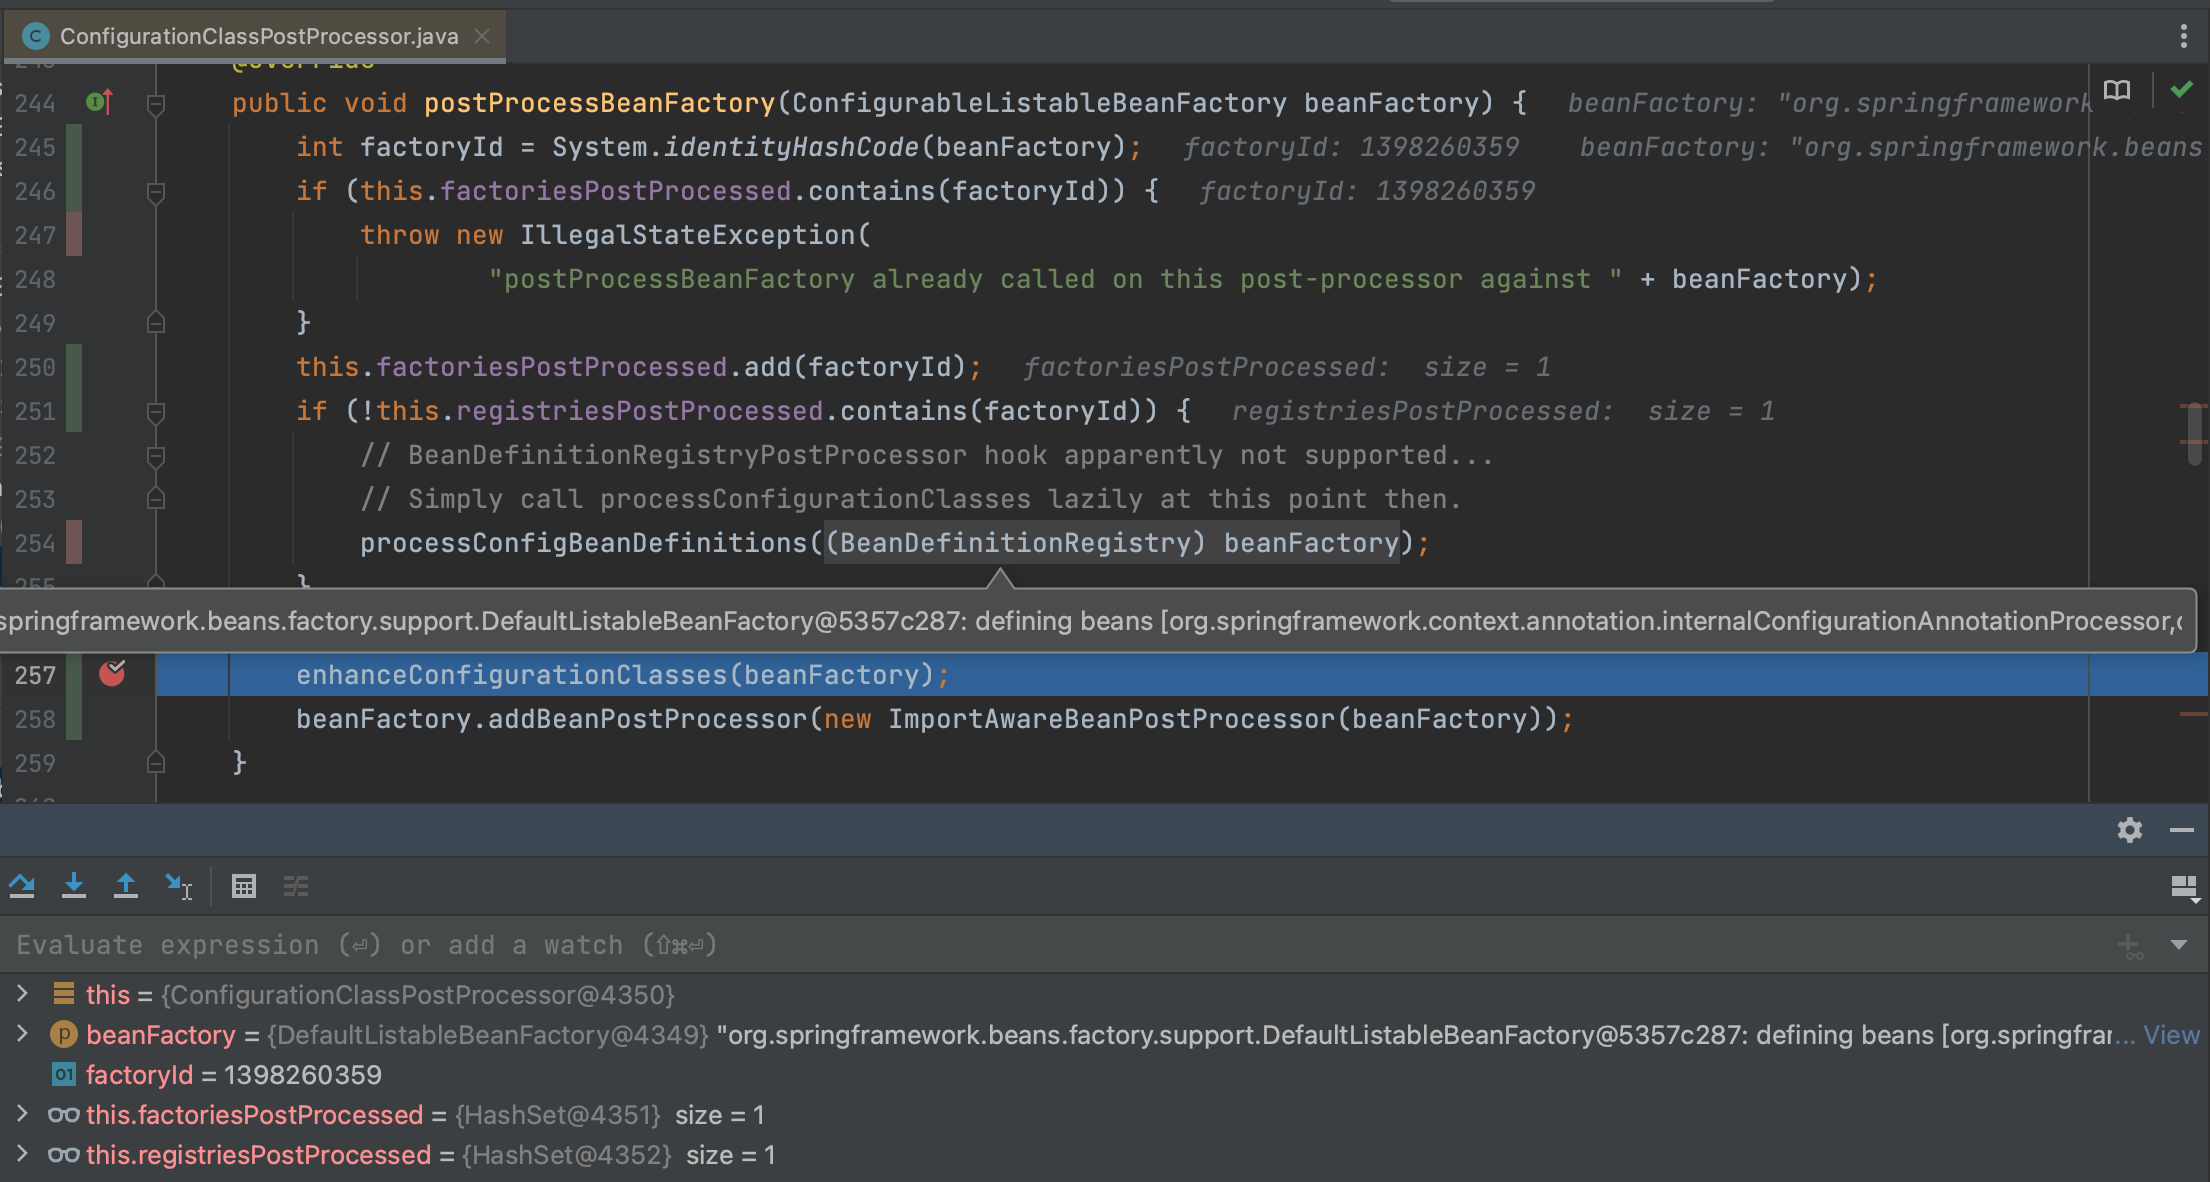
在Spring boot 自动配置实现原理一文中,已经详细介绍过自动配置类的加载与BeanDefinition 注册过程, 在其中9.5 小节中讲了在ConfigurationClassPostProcessor中重写的BeanFactoryPostProcessor.postProcessBeanFactory中,实现了对@Configuration 注解动态代理类的生成。 这里讲以MybatisAutoConfiguration 的实例化为例详细讲解这一过程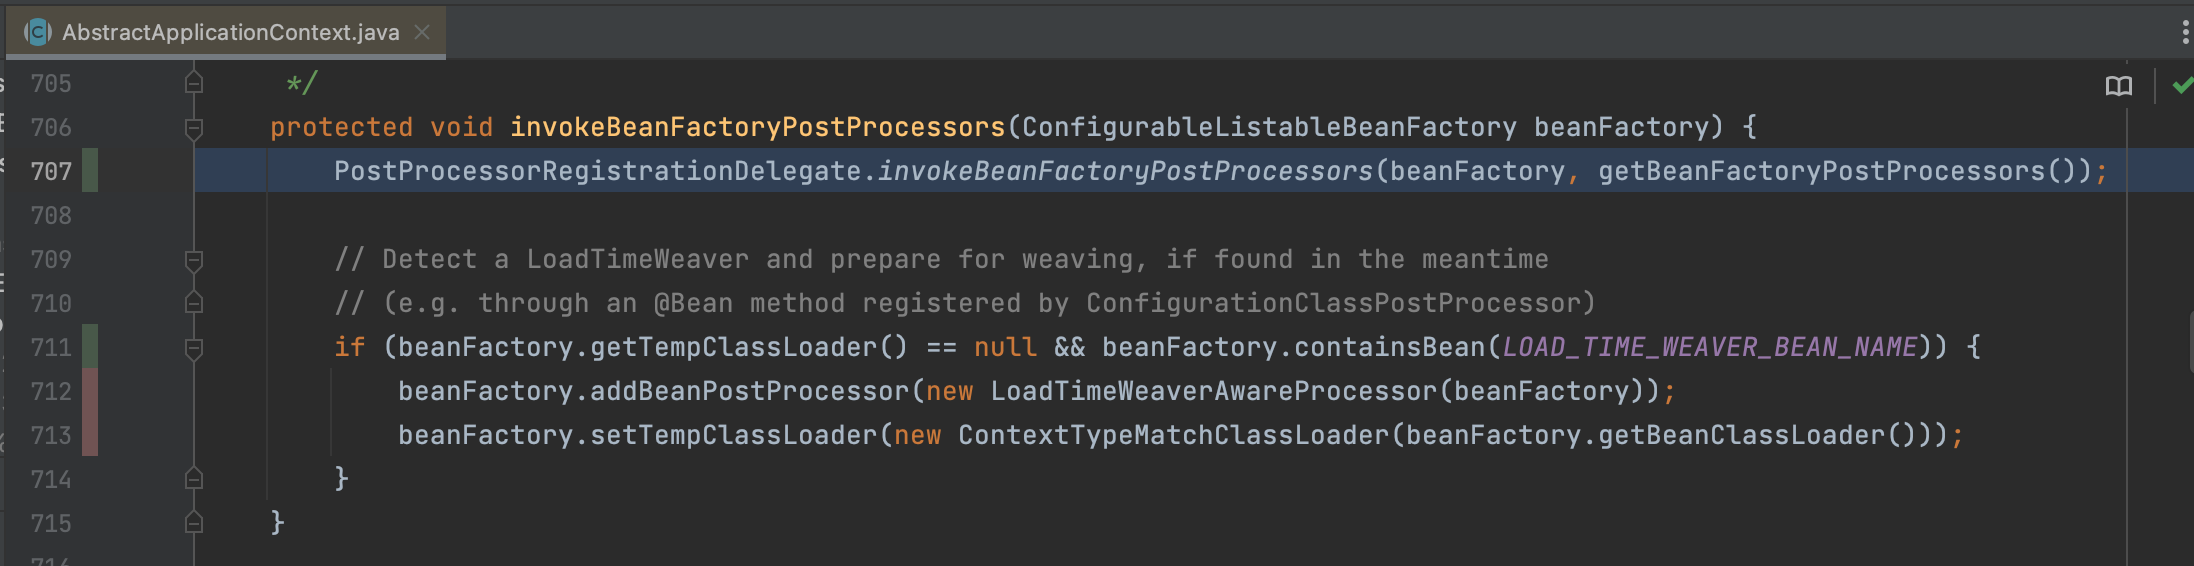
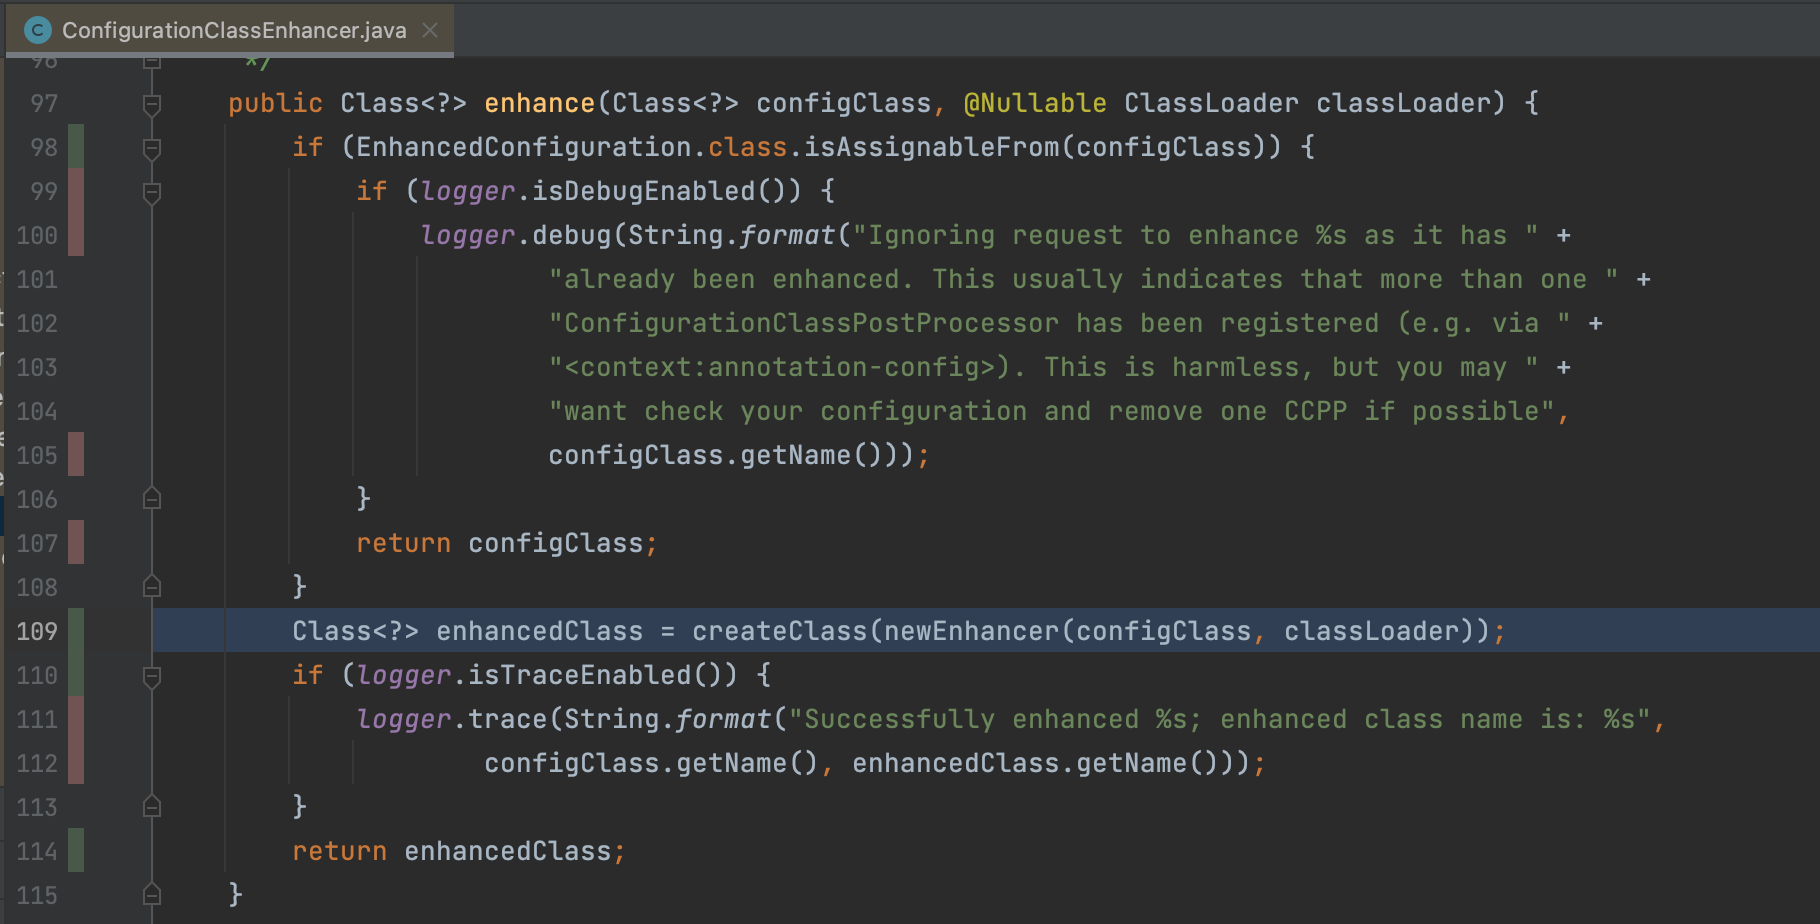

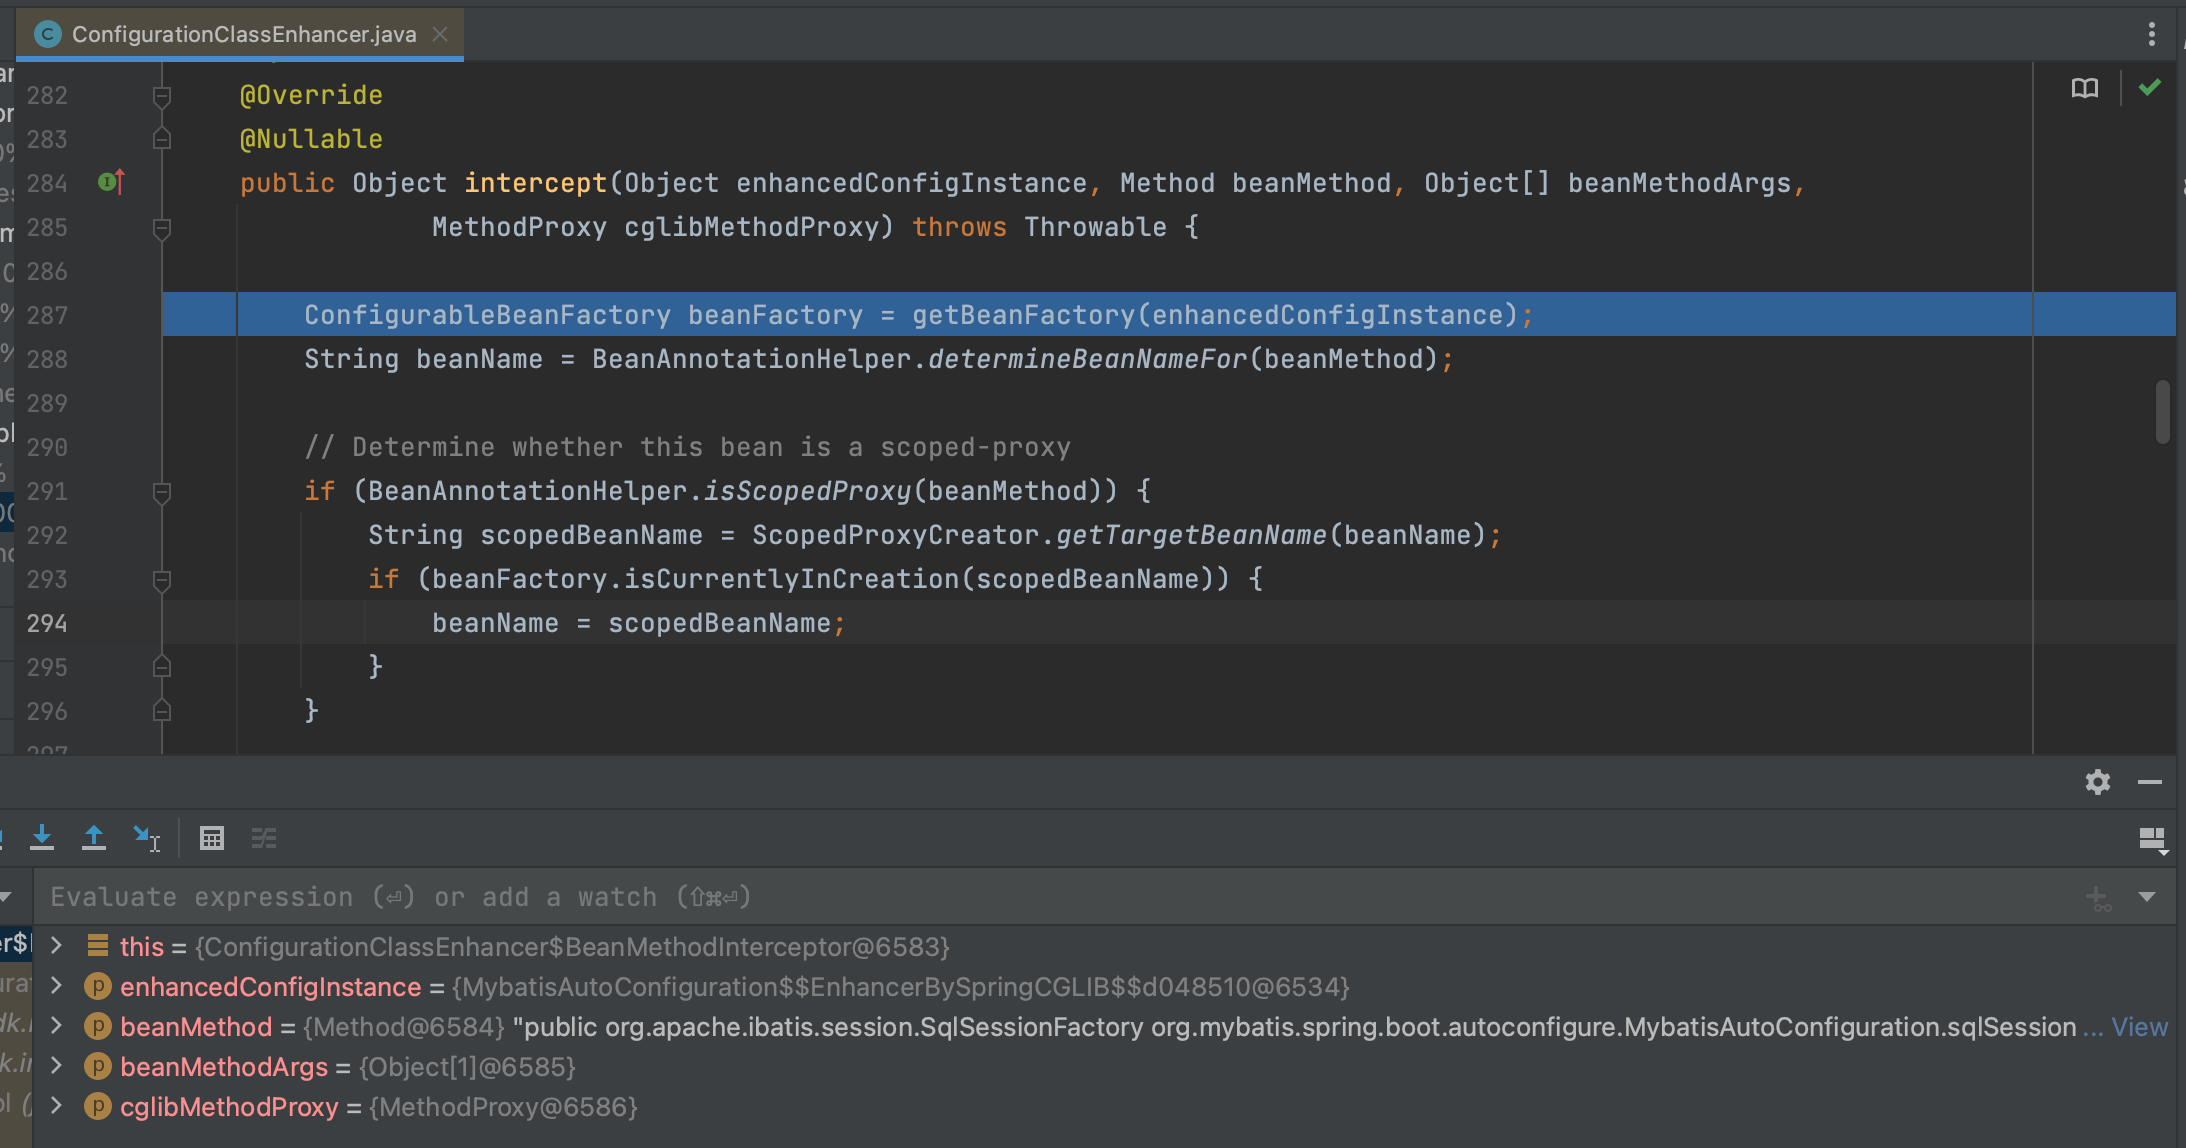
来看下拦截逻辑。1
2
3
4
5
6
7
8
9
10
11
12
13
14
15
16
17
18
19
20
21
22
23
24
25
26
27
28
29
30
31
32
33
34
35
36
37
38
39
40
41
42
43
44
45
46
47
48
49class ConfigurationClassEnhancer {
private static final Callback[] CALLBACKS = new Callback[] {
new BeanMethodInterceptor(),
new BeanFactoryAwareMethodInterceptor(),
NoOp.INSTANCE
};
private static class BeanMethodInterceptor implements MethodInterceptor, ConditionalCallback {
public Object intercept(Object enhancedConfigInstance, Method beanMethod, Object[] beanMethodArgs,
MethodProxy cglibMethodProxy) throws Throwable {
ConfigurableBeanFactory beanFactory = getBeanFactory(enhancedConfigInstance);
String beanName = BeanAnnotationHelper.determineBeanNameFor(beanMethod);
// Determine whether this bean is a scoped-proxy
if (BeanAnnotationHelper.isScopedProxy(beanMethod)) {
String scopedBeanName = ScopedProxyCreator.getTargetBeanName(beanName);
if (beanFactory.isCurrentlyInCreation(scopedBeanName)) {
beanName = scopedBeanName;
}
}
if (factoryContainsBean(beanFactory, BeanFactory.FACTORY_BEAN_PREFIX + beanName) &&
factoryContainsBean(beanFactory, beanName)) {
Object factoryBean = beanFactory.getBean(BeanFactory.FACTORY_BEAN_PREFIX + beanName);
if (factoryBean instanceof ScopedProxyFactoryBean) {
// Scoped proxy factory beans are a special case and should not be further proxied
}
else {
// It is a candidate FactoryBean - go ahead with enhancement
return enhanceFactoryBean(factoryBean, beanMethod.getReturnType(), beanFactory, beanName);
}
}
if (isCurrentlyInvokedFactoryMethod(beanMethod)) {
if (logger.isInfoEnabled() &&
BeanFactoryPostProcessor.class.isAssignableFrom(beanMethod.getReturnType())) {
}
return cglibMethodProxy.invokeSuper(enhancedConfigInstance, beanMethodArgs);
}
return resolveBeanReference(beanMethod, beanMethodArgs, beanFactory, beanName);
}
}
最后生成的代理类重新设置给了BeanDefinition 的一个属性。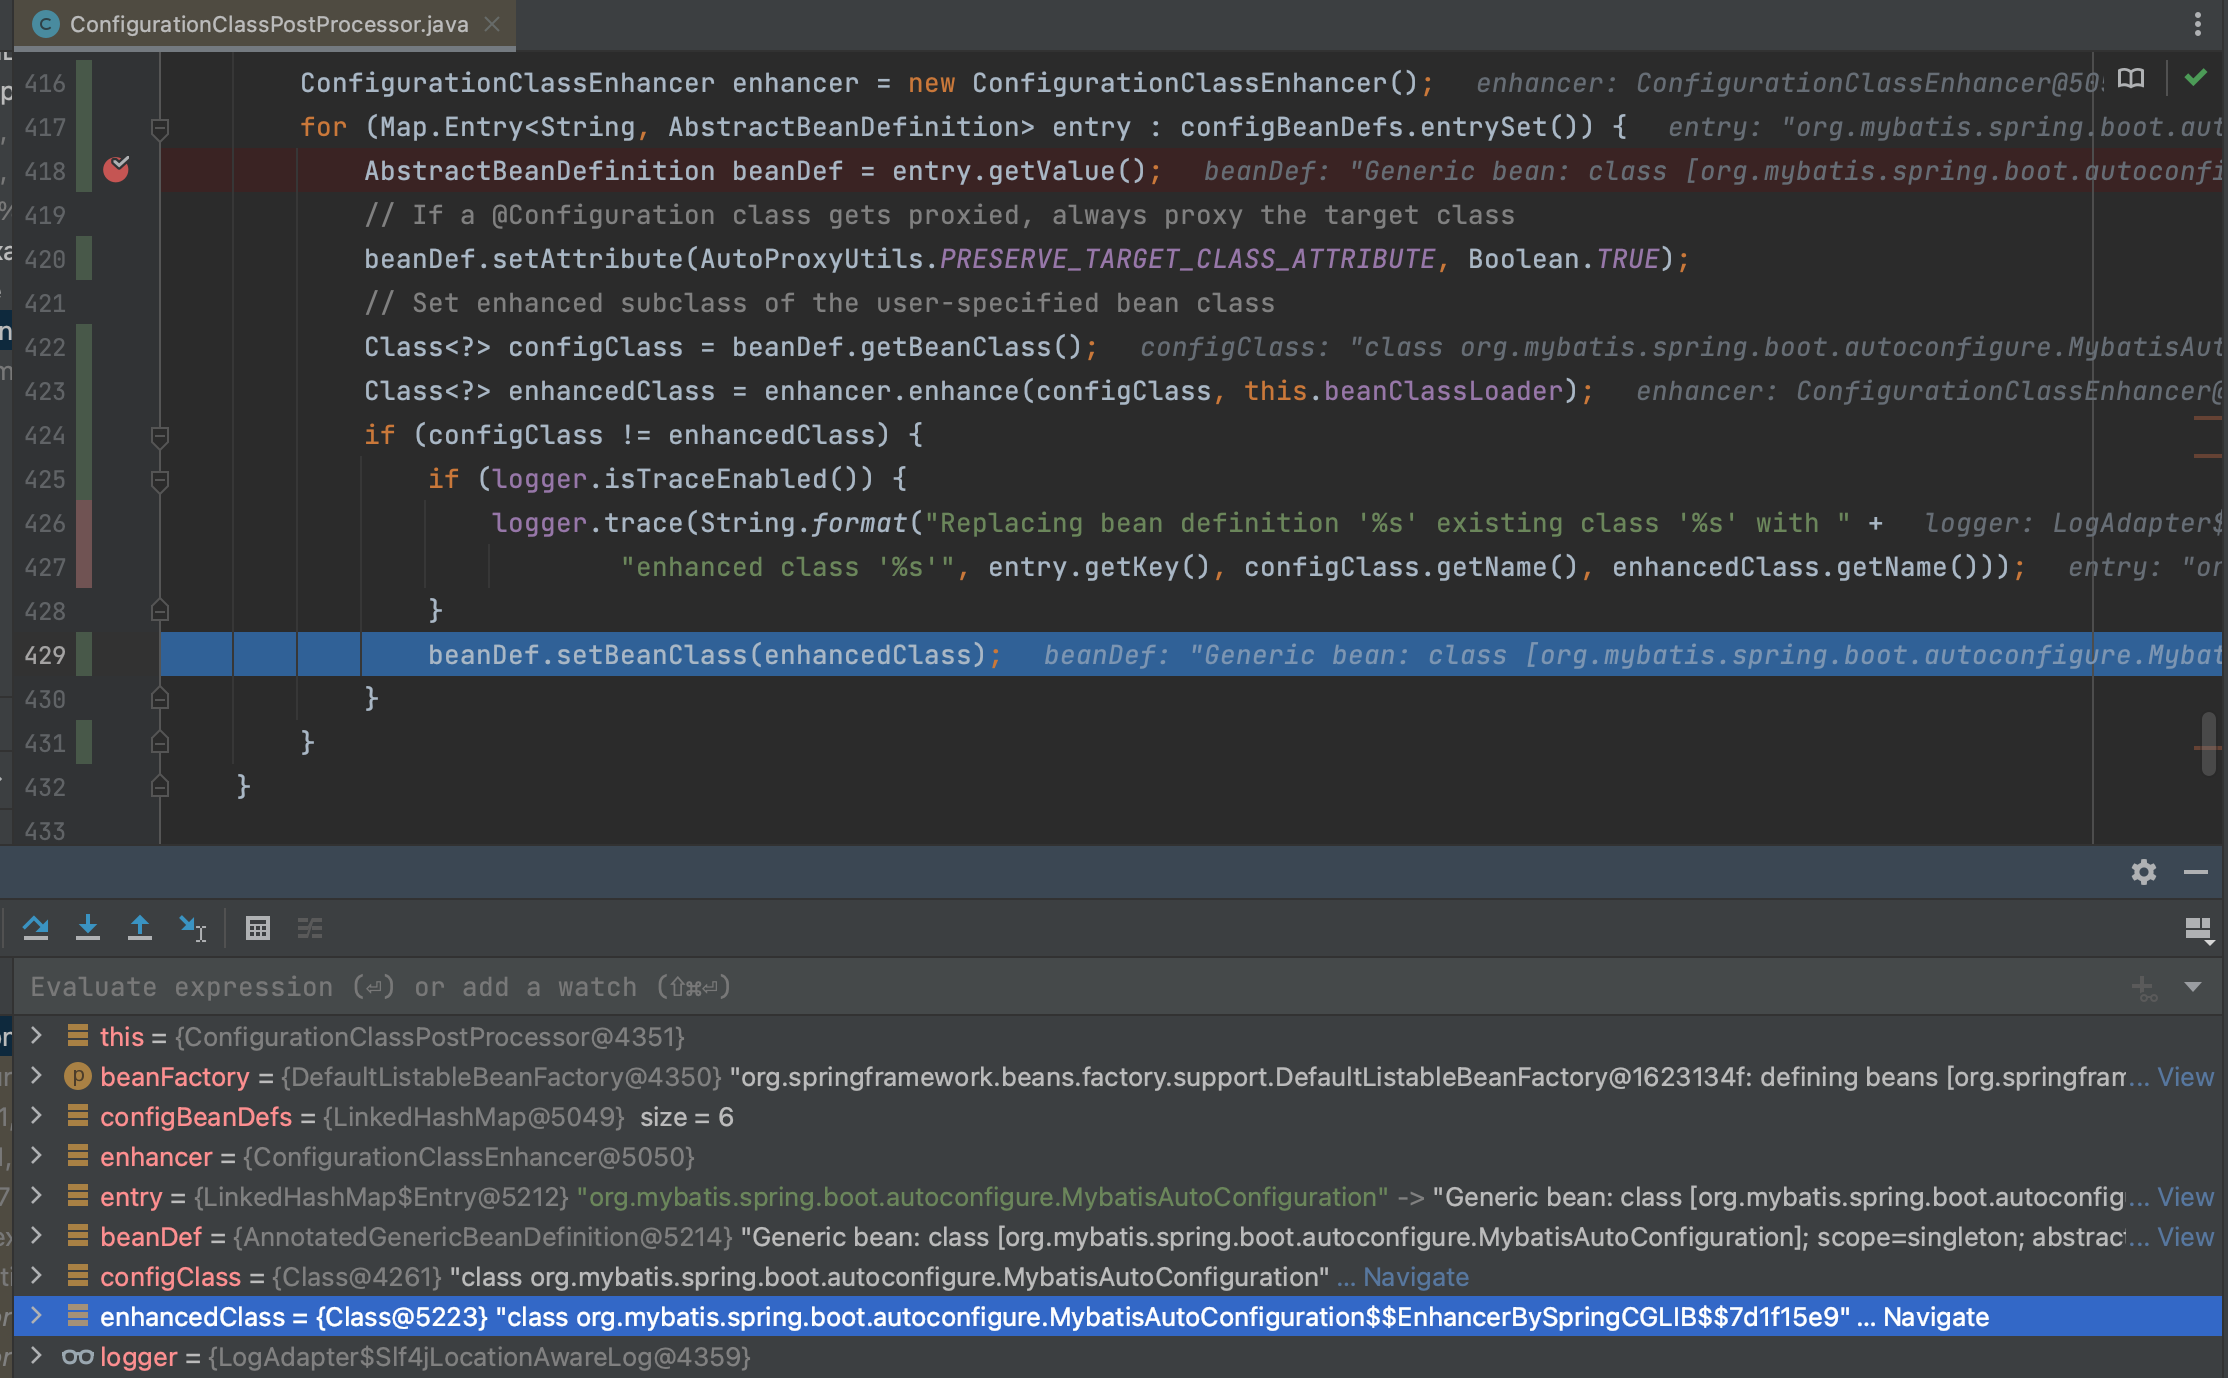
3.2 sqlSessionFactory 实例化
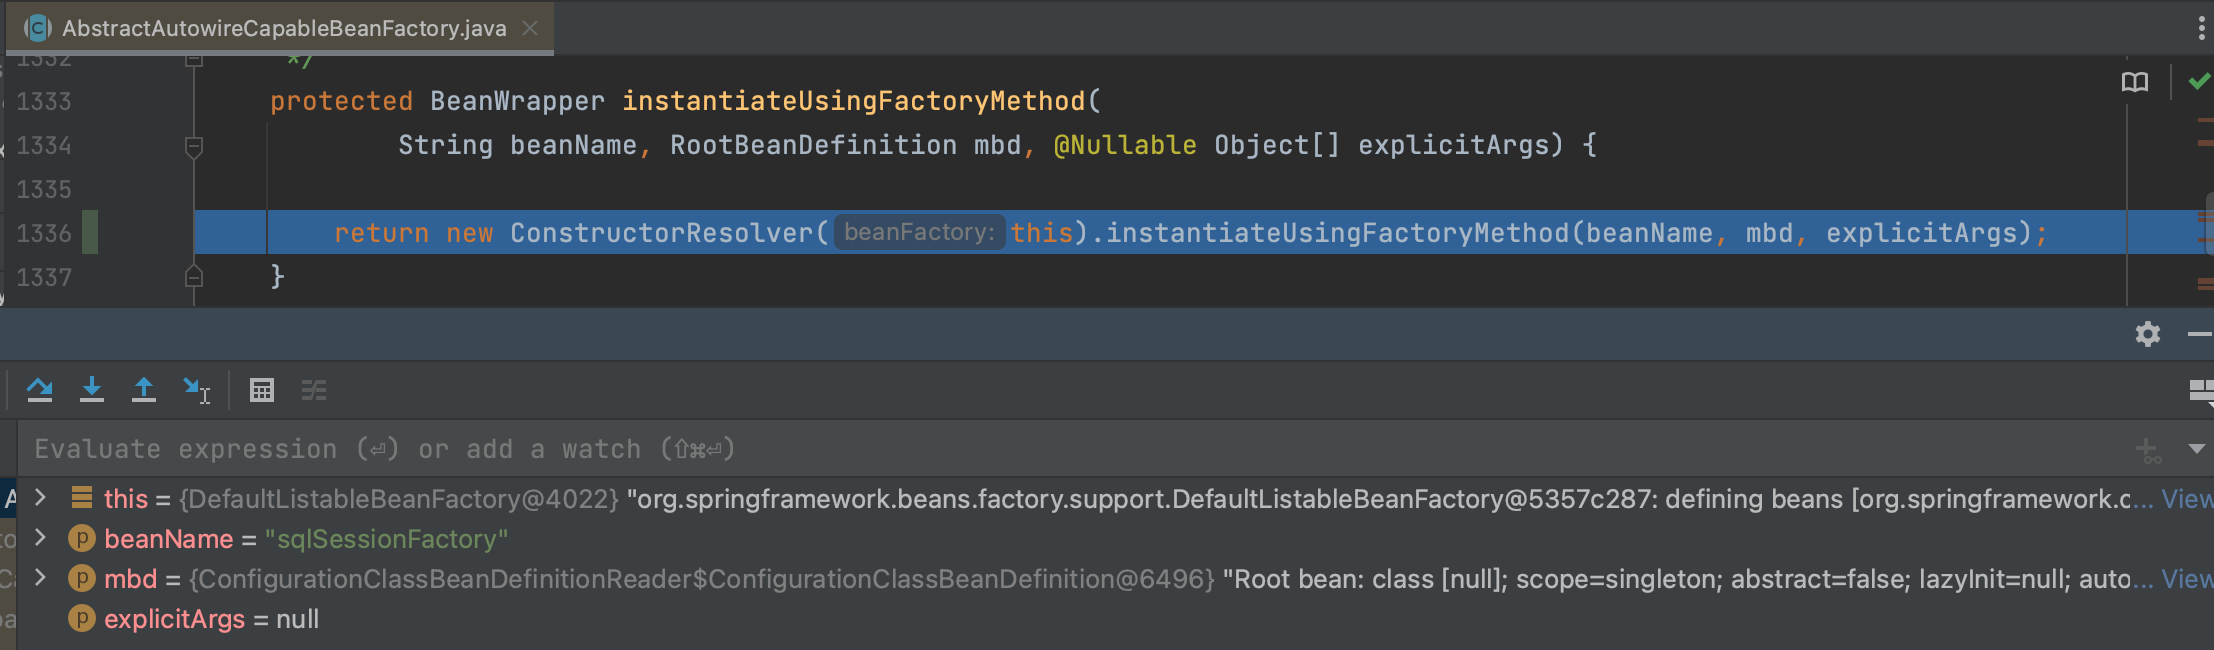
3.2.1 instantiateUsingFactoryMethod
在 Spring 中,有几种常见的 Bean 实例化方式:
- 使用构造函数实例化。
- 使用Supplier实例化。
- 使用工厂方法实例化。
针对sqlSessionFactory ,其实例化过程使用的是 instantiateUsingFactoryMethod工厂方法实例化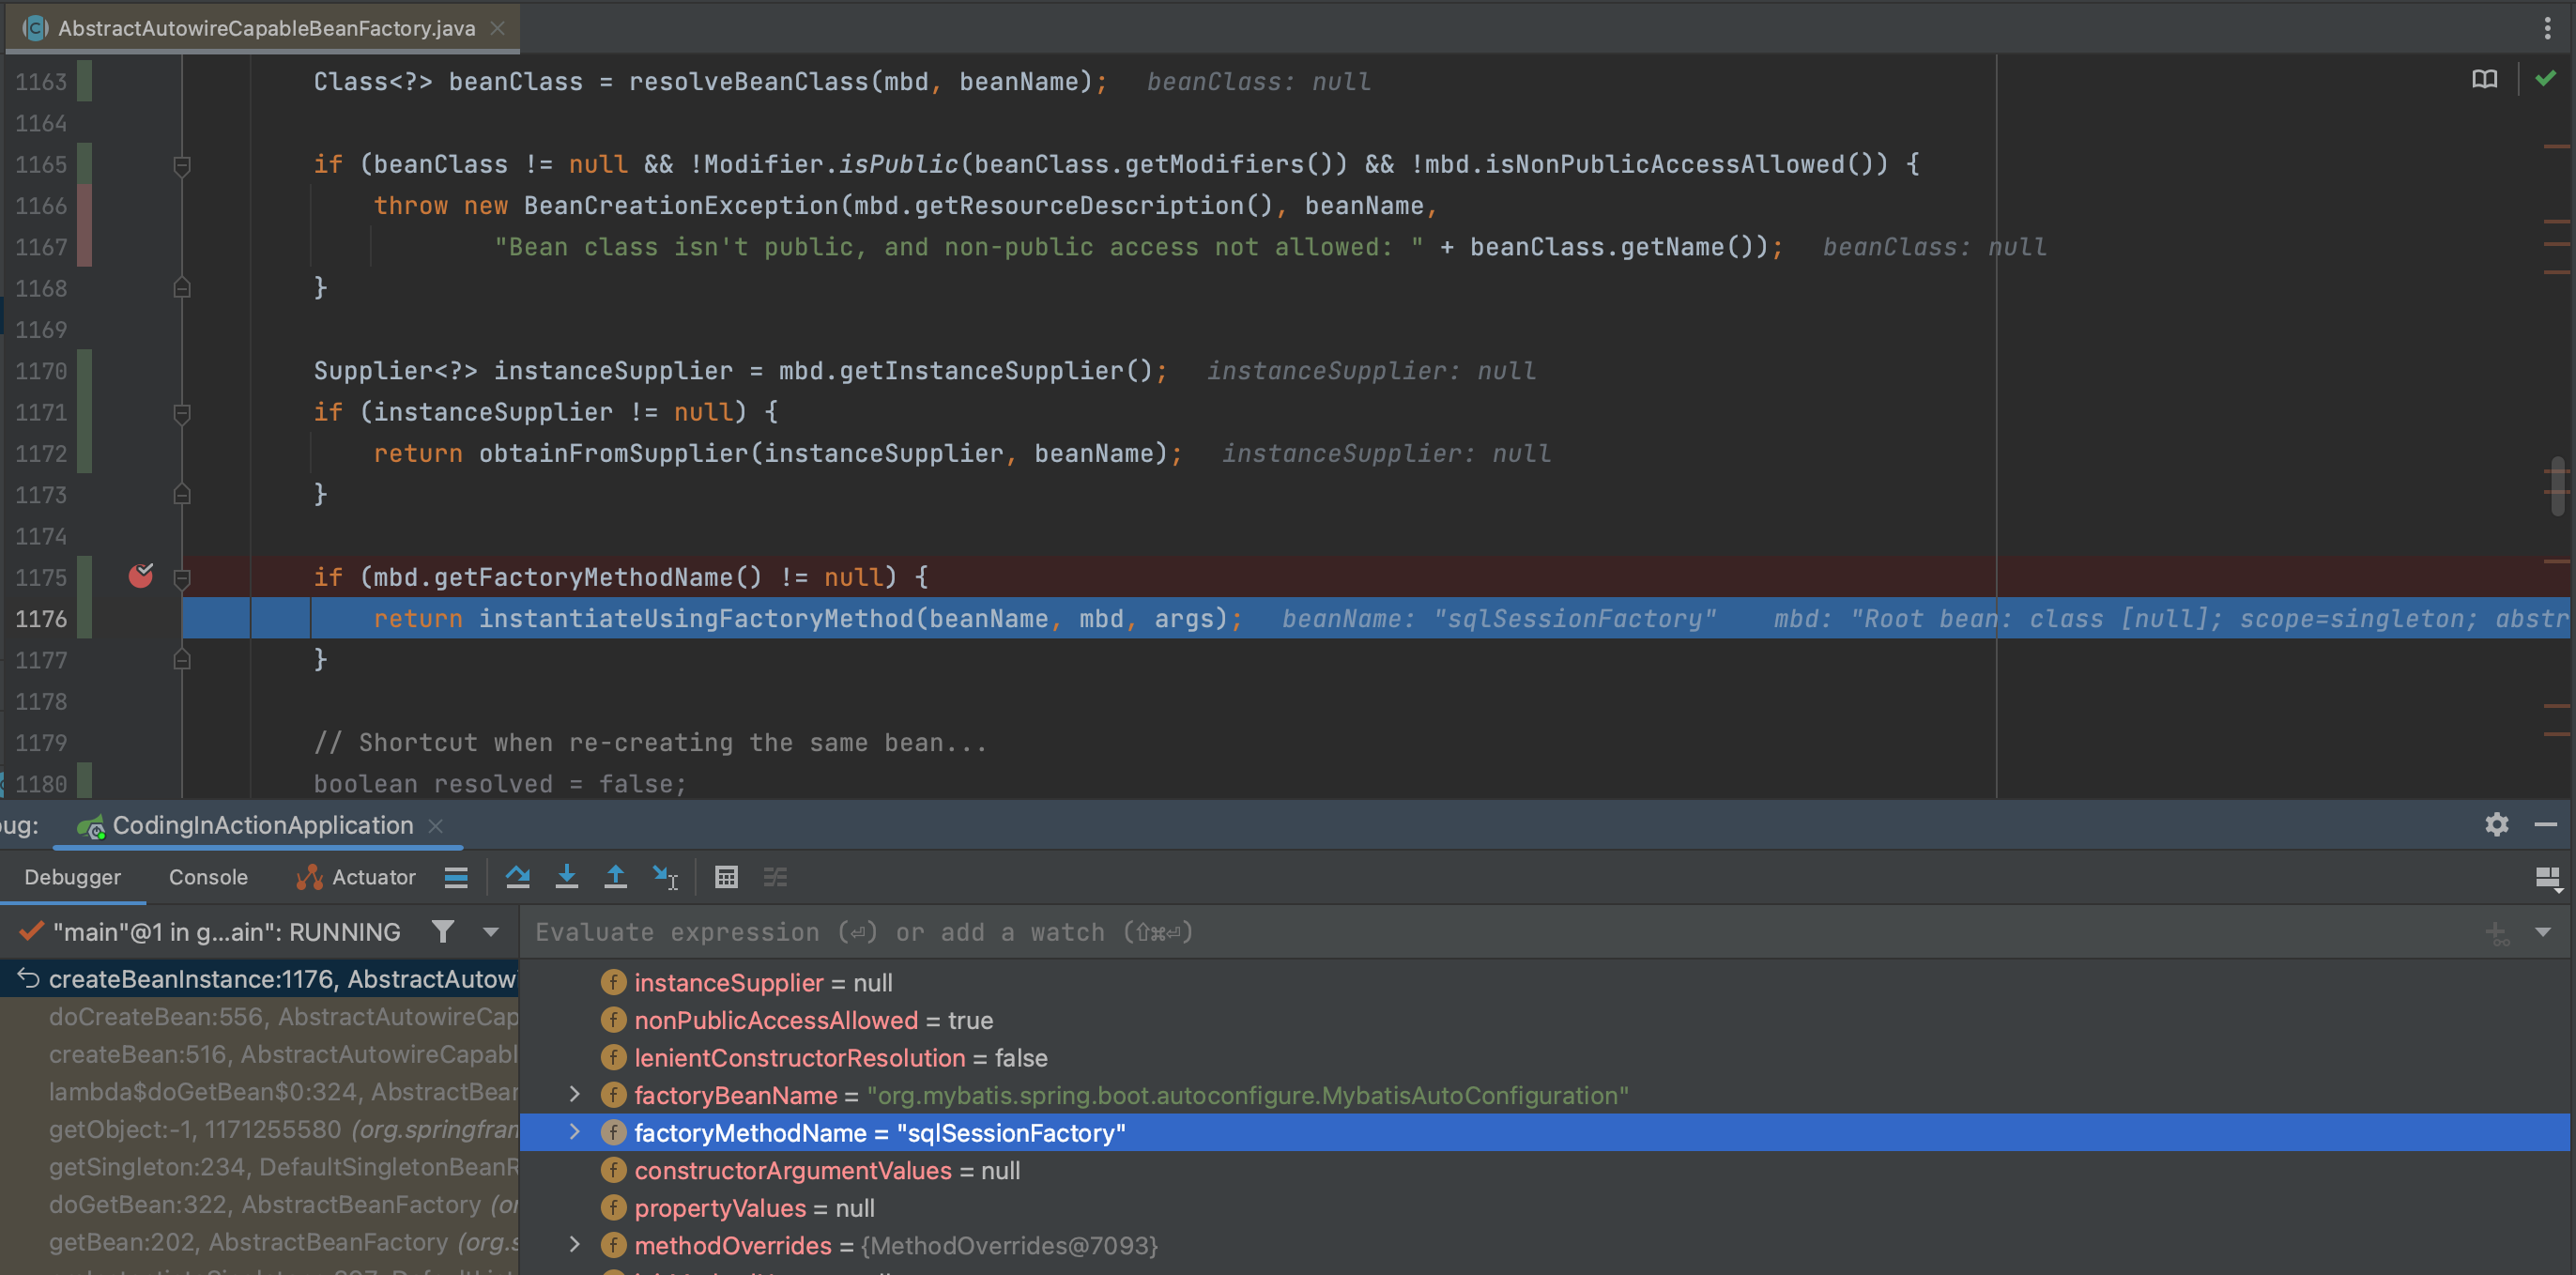

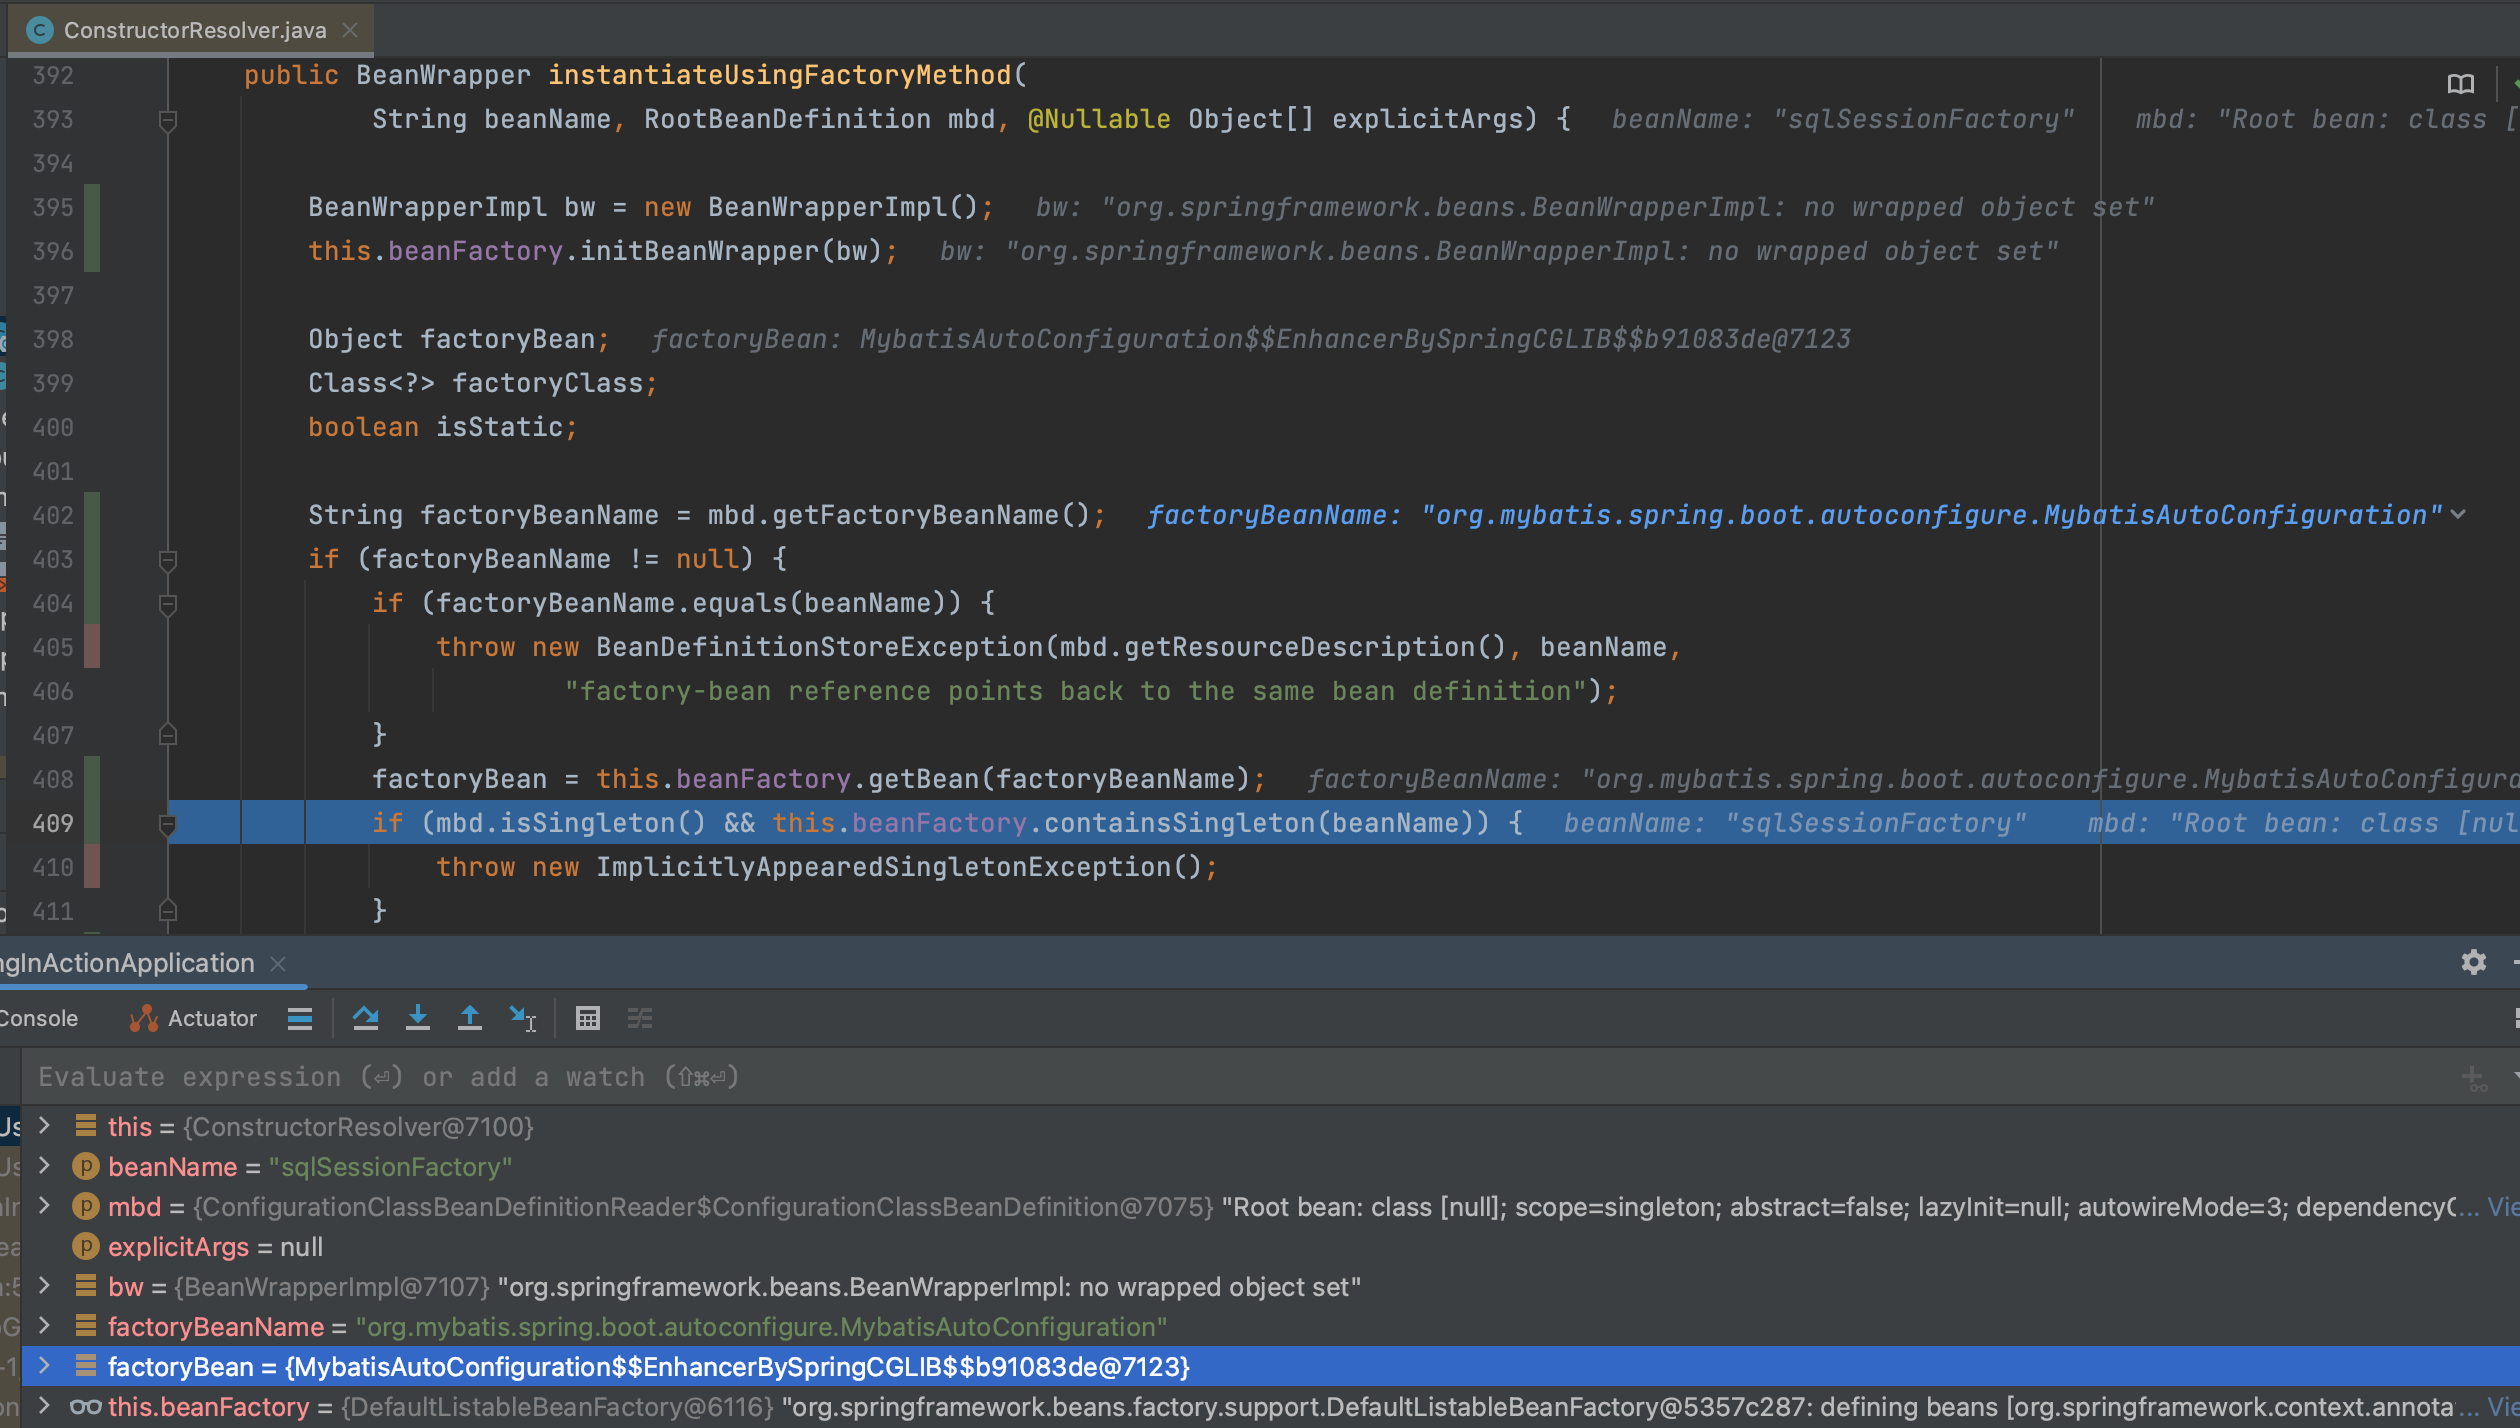
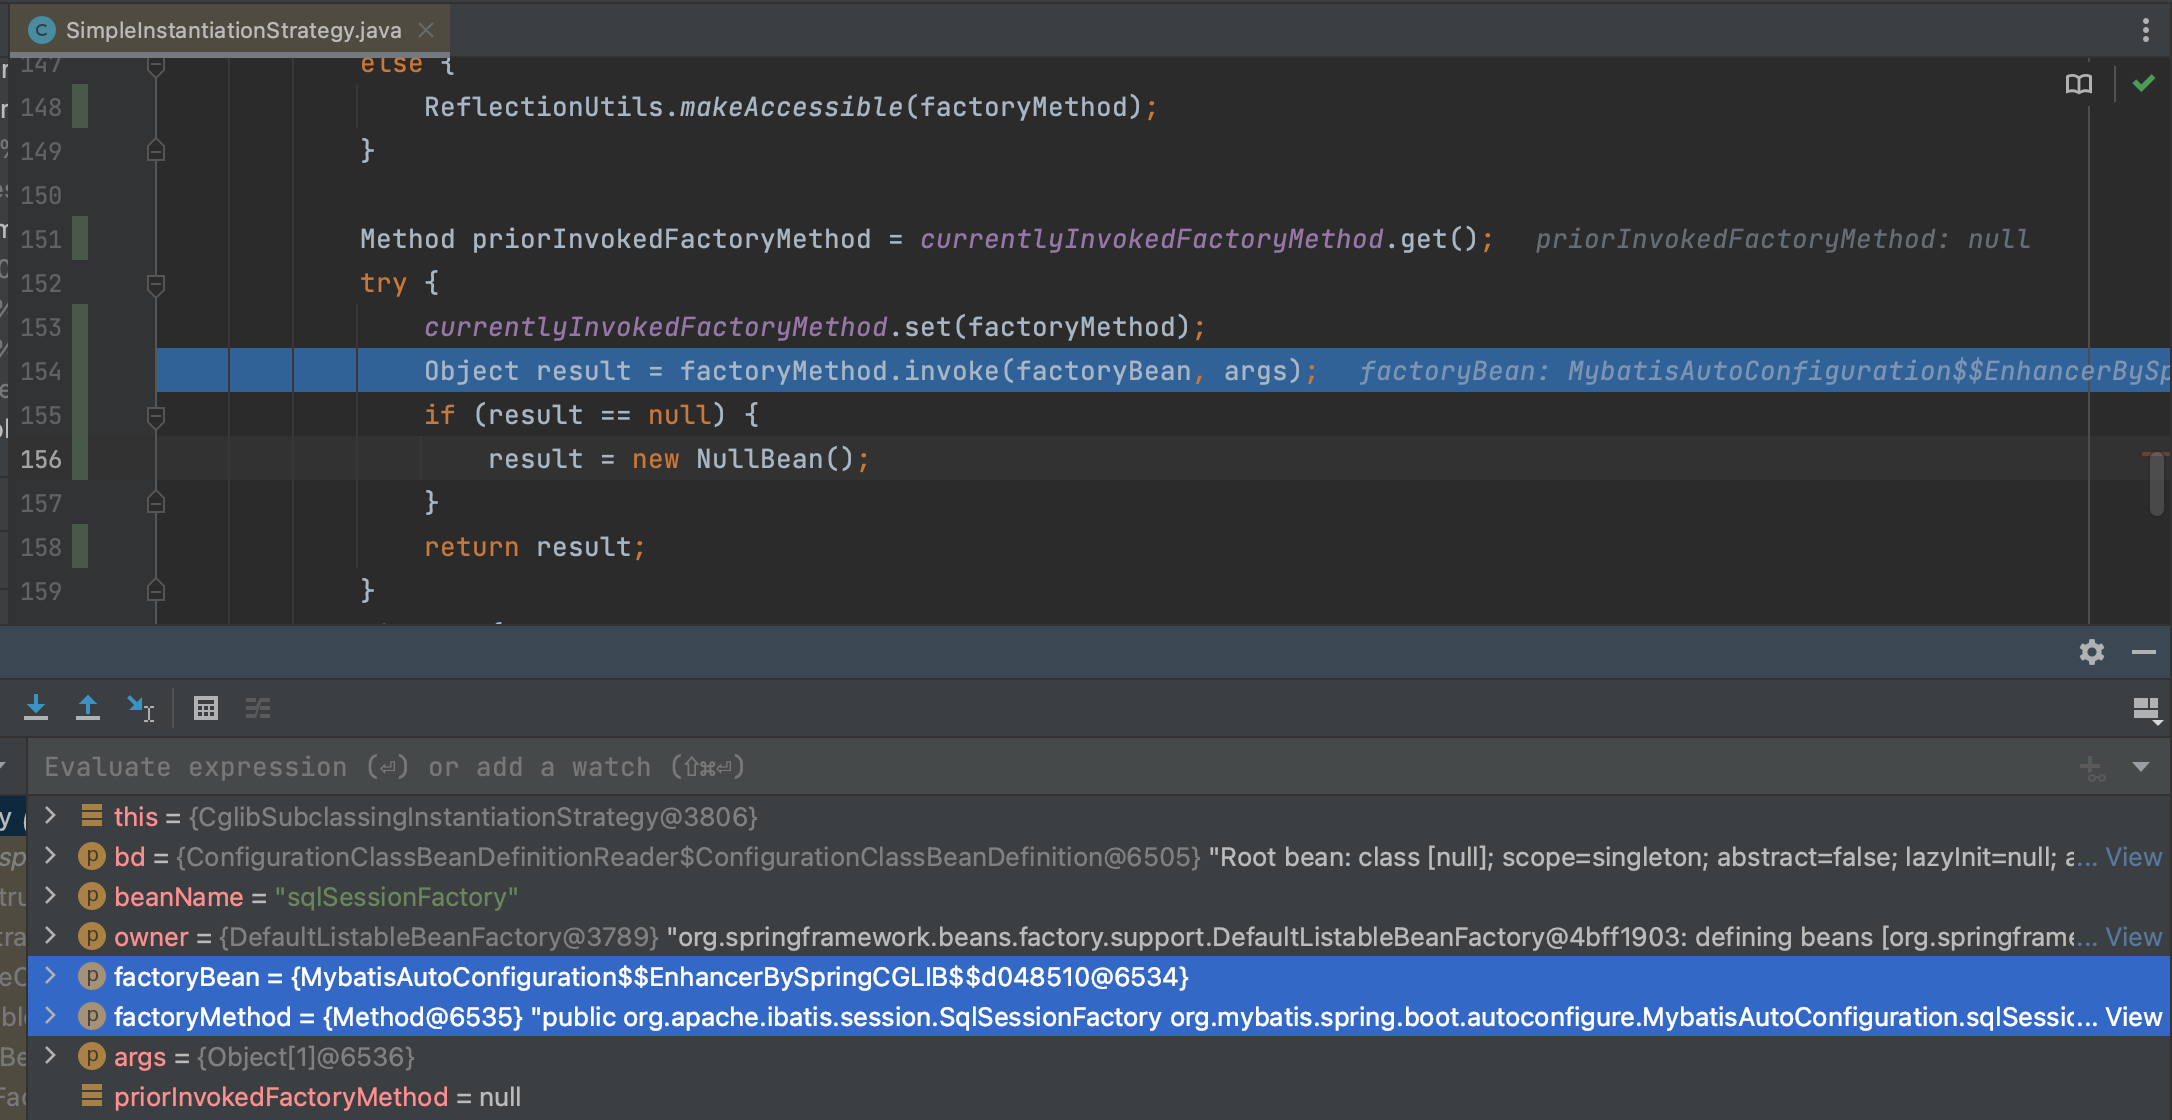
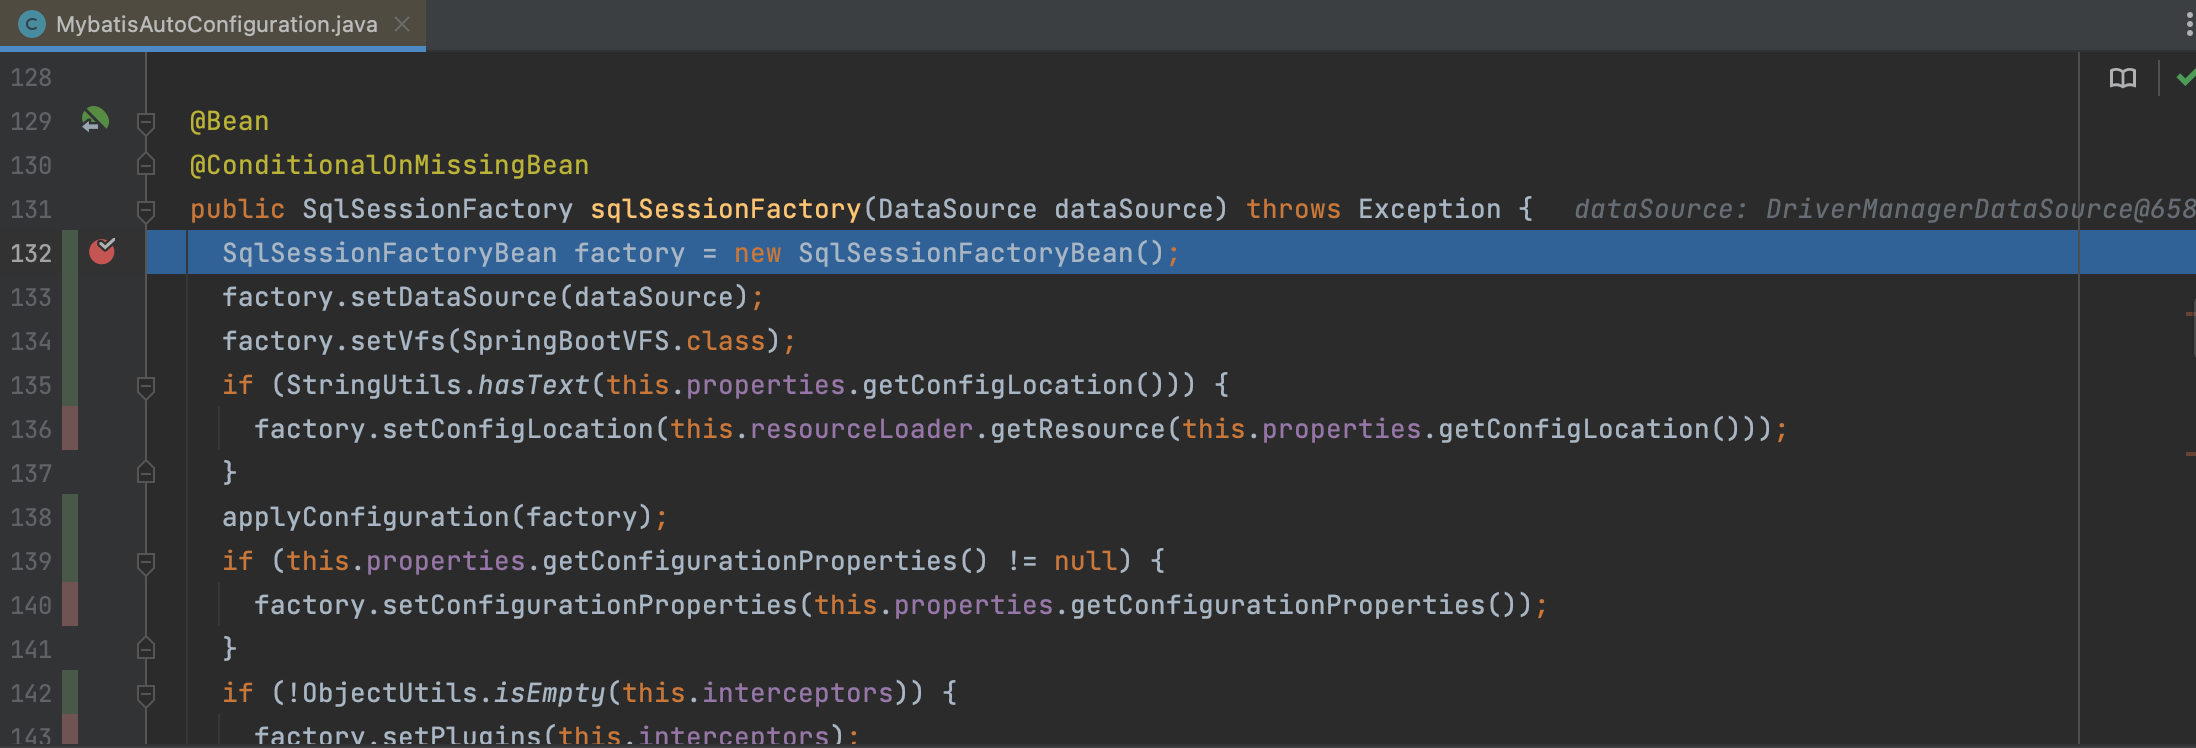
最后解析出, 使用instantiateUsingFactoryMethod实例化sqlSessionFactory 时, 用到的factoryBean 是 MybatisAutoConfiguration 的动态代理对象,用的方法是sqlSessionFactory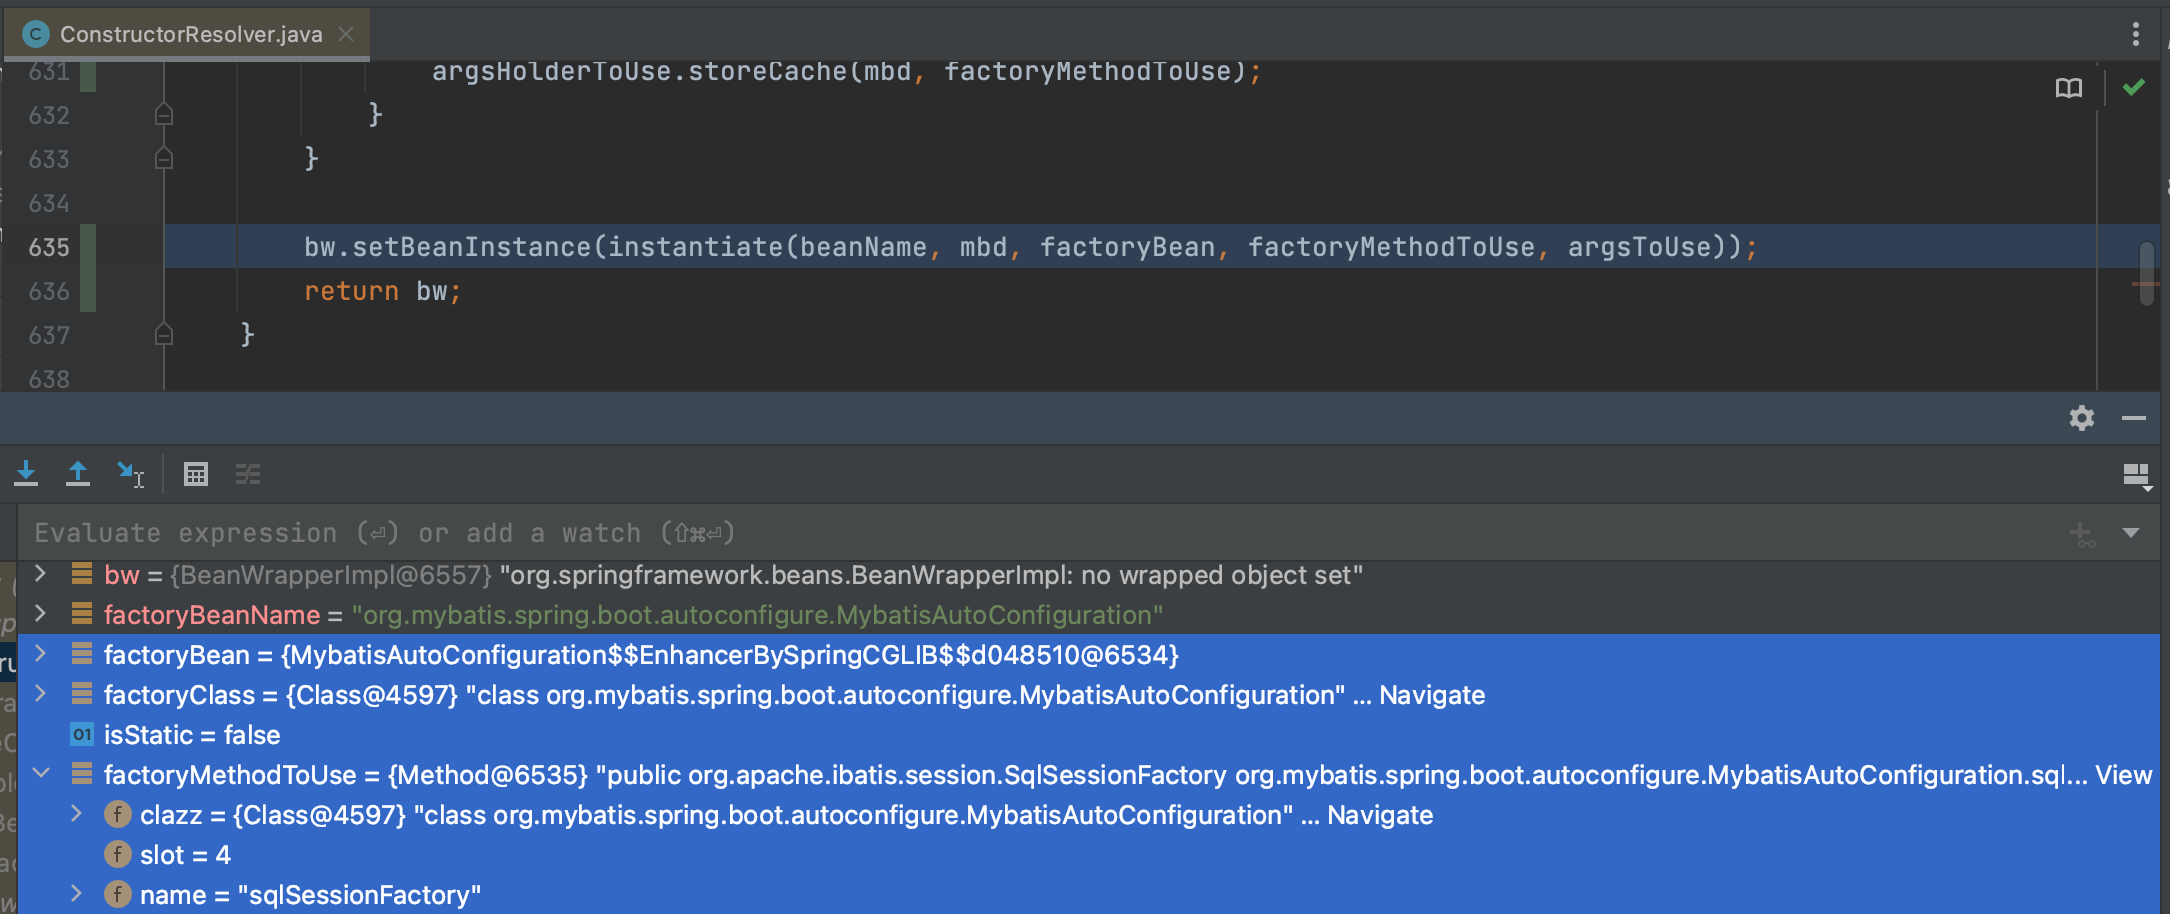
3.2.2 动态代理拦截
这里来到经典的反射逻辑来调用实例对象上的方法,此时factoryBean是CGLIB 动态代理对象, 所以在调用方法时会先走在拦截逻辑上